# AutoReel Overview

AutoReel is an all-in-one real estate marketing platform for **AI-powered photo editing** and **photo-to-video creation**. Transform your listing photos into cinematic, scroll-stopping videos in minutes — no editing skills required. Just import your photos, customize your visuals, and share on MLS and social media.

{% stepper %}
{% step %}

### Upload your photos

Simply import listing photos directly from Realtor.com or Dropbox with one click, or upload them from your device manually.

<figure><img src="/files/8ZvpJZgdD7oYeO91xXPJ" alt="" width="375"><figcaption></figcaption></figure>
{% endstep %}

{% step %}

### Edit and virtually stage your photos

Enhance your photos before the video is created. Add twilight skies, repair lawns, remove cars, or virtually stage empty rooms — so every shot looks its best on screen.

<figure><img src="/files/9LQYHl9rze8YYHrhOzMD" alt="" width="375"><figcaption></figcaption></figure>

<figure><img src="/files/CmC10J29NB5KGXg6ZWfk" alt="" width="375"><figcaption></figcaption></figure>

{% content-ref url="/pages/NPn8DbKv7n39Qi6dxiBS" %}
[Photo Edits & Virtual Staging](/photo-edits-and-virtual-staging/photo-editing-and-virtual-staging)
{% endcontent-ref %}
{% endstep %}

{% step %}

### Create a video

Generate a stunning video from just your photos in just minutes.

<figure><img src="/files/1CTG2fU8KdLYlmdqGTBx" alt=""><figcaption></figcaption></figure>

{% content-ref url="/pages/HF8FUbJ4rv0Dv7sJyOKo" %}
[How To: Create a Video](/creating-a-video/how-to-create-a-video)
{% endcontent-ref %}
{% endstep %}

{% step %}

### Brand your video

Add templates, branding, music, voiceovers, and avatars to truly make the video yours.&#x20;

{% content-ref url="/pages/7WBjaXe2w0nLbGNrsDGF" %}
[Create an unbranded video](/creating-a-video/how-to-create-a-video/create-an-unbranded-video)
{% endcontent-ref %}
{% endstep %}

{% step %}

### Share everywhere

That's it! Copy your video link or download your video to share on MLS, with clients, or on social media.&#x20;

<figure><img src="/files/Amh4QQHMi9WrznxPLLnA" alt="" width="375"><figcaption></figcaption></figure>

{% content-ref url="/pages/3llHsjApE8Ueh1vFA3hO" %}
[How To: Download and Share Videos](/creating-a-video/how-to-download-and-share-videos)
{% endcontent-ref %}
{% endstep %}
{% endstepper %}


# How To: Create a Video

## Step by Step Video Walkthrough (5 minutes)

{% embed url="<https://www.youtube.com/watch?v=vufhOReZXhM>" %}

When you create a video in AutoReel, the platform automatically generates two versions simultaneously:

* **Unbranded Video:** Clean, logo-free video you can post on MLS or share directly with clients. Each unbranded video consumes 1 video credit, as AI video rendering is resource-intensive.
* **Branded Video:** More eye-catching video that includes your branding, music, templates, video effects, avatars, and voiceovers.&#x20;
  * Branded videos are included in your AutoReel plan and do not consume video credits.
  * You can create unlimited branded videos by applying Quick Edits to your unbranded video – all included with no additional video credit usage.

Start by learning how to create an unbranded video, then learn how to add branding to make the video truly your own.


# Create an unbranded video

{% stepper %}
{% step %}

### Create a project

Create and name your project. Each project should have its own set of photos, which will be used for edits and videos.&#x20;

<figure><img src="/files/KzT5EIJYrpAfc39jR4Se" alt=""><figcaption></figcaption></figure>
{% endstep %}

{% step %}

### Upload your photos

Upload your listing photos using any of the following methods:

1. **Upload via URL:** Enter a Realtor.com listing URL and click **Import** to pull in your photos automatically.
2. **Import from Dropbox:** Click **Import from Dropbox**, sign in, and select your photos.
3. **Upload from device:** Click inside the dotted area or drag and drop photos directly from your computer or phone.&#x20;

Once done, click **Next** to proceed to the next step.&#x20;

<figure><img src="/files/V4kmsss61MvI9g4WoX2T" alt=""><figcaption></figcaption></figure>
{% endstep %}

{% step %}

### Edit and virtually stage your photos

To learn how to edit and virtually stage photos, visit [Photo Editing & Virtual Staging](/photo-edits-and-virtual-staging/photo-editing-and-virtual-staging) for a full walkthrough.&#x20;

<figure><img src="/files/4aY2BqyXETmA59e4q8Sj" alt=""><figcaption></figcaption></figure>
{% endstep %}

{% step %}

### Select which photos to use in the video

Choose which photos to include in your video. Click a photo on the left to add it to your video — it will move to the right side. To reorder, drag and drop the photos on the right. To remove a photo, simply click it from the right side to move it back.

Paid plans support up to **20 photos**, which produces approximately a **1-minute video**.

> 💡 **Pro tip:** Each photo becomes a 3-second clip, so use that as a guide when deciding how many photos to include.

<figure><img src="/files/hxI2bWp6LfsyRTY9yW9m" alt=""><figcaption></figcaption></figure>

<figure><img src="/files/3RgaUTn9MGV6O0vU1KUr" alt=""><figcaption></figcaption></figure>
{% endstep %}

{% step %}

### Select the video orientation

Choose between **Landscape** or **Portrait** depending on where you plan to share your video.

* **Landscape:** Best for MLS, YouTube, Facebook, and LinkedIn.
* **Portrait:** Best for Instagram and TikTok.

<figure><img src="/files/uWQqfU2RWqGtLsUATTQI" alt=""><figcaption></figcaption></figure>
{% endstep %}

{% step %}

### Crop your scenes

By default, AutoReel focuses on the center of each photo. To adjust, click the **Crop** button on any photo, then drag or zoom to capture the best area, then click **Apply**.

This is especially useful when creating portrait videos from landscape photos, where you may want to focus on a specific part of the room rather than just the center.

<figure><img src="/files/cj72KJ9FVjWrrgZB4dIB" alt="" width="375"><figcaption></figcaption></figure>

<figure><img src="/files/XXLPfnDxq2vE76MKt3HN" alt="" width="375"><figcaption></figcaption></figure>
{% endstep %}

{% step %}

### Select the camera motion

By default, AutoReel uses **Auto** mode — AI analyzes each photo and applies the best camera motion based on the angle and composition.

For more control, click the **Camera Motion** button on any photo and choose from:

* **Push In**
* **Push Out**
* **Orbit Left**
* **Orbit Right**

> ⚠️ **Heads up:** Custom camera motion may increase the likelihood of AI artifacts in your video.

<figure><img src="/files/Td3VZij6XVbCxwpEQqg6" alt="" width="375"><figcaption></figcaption></figure>

<figure><img src="/files/f3nf5TP2jP1VFBMOvV0f" alt="" width="375"><figcaption></figcaption></figure>
{% endstep %}

{% step %}

### Review video settings&#x20;

Before rendering, review the following settings:

* **AI Engine:** Defaults to **v25**, our latest and most accurate model.
* **Resolution:** Defaults to **1080p** for highest quality, or choose **720p** for faster rendering.
* **Orientation:** Confirm landscape or portrait is correct.
* **Branding:** Confirm whether you'd like to add branding in the next step.&#x20;

Once everything looks good, click **Render video** to kick off your unbranded video.

> ⚠️ **Heads up:** Rendering will consume **1 video credit** and cannot be undone. You won't be able to edit the base video after this point — branding is added on top while the video processes.

<figure><img src="/files/1aTWLxaavNuSLhZiEsKb" alt="" width="375"><figcaption></figcaption></figure>
{% endstep %}

{% step %}

### Add branding to the video

This is where your video comes to life. Layer in any of the following to make your video stand out:

* [**Intro & Outro Templates**](/creating-a-video/how-to-create-a-video/create-a-branded-video/templates)
* [**Branding (logos, profile info)**](/creating-a-video/how-to-create-a-video/create-a-branded-video/brand-kits)
* [**Music**](/creating-a-video/how-to-create-a-video/create-a-branded-video/music)
* [**Voiceovers and Avatars**](/creating-a-video/how-to-create-a-video/create-a-branded-video/voiceovers-and-avatars)

See the Create a Branded Video section to learn how to set up each of these.

<figure><img src="/files/7geHUELcsoG6jUNvFBxo" alt=""><figcaption></figcaption></figure>
{% endstep %}
{% endstepper %}


# Create a branded video

Use the sidebar on the left to customize your video with any combination of the following:

* [**Intro & Outro Templates**](/creating-a-video/how-to-create-a-video/create-a-branded-video/templates)
* [**Branding (logos, profile info)**](/creating-a-video/how-to-create-a-video/create-a-branded-video/brand-kits)
* [**Music**](/creating-a-video/how-to-create-a-video/create-a-branded-video/music)
* [**Voiceovers and Avatars**](/creating-a-video/how-to-create-a-video/create-a-branded-video/voiceovers-and-avatars)

{% embed url="<https://youtu.be/aSaShIfgWTM>" %}

A live preview updates on the right as you make changes. To switch orientation, click **Landscape** or **Portrait** directly above the preview — the video will be cropped from the original unbranded video accordingly.

<figure><img src="/files/dPM7QvWcJUGJjPlWovi5" alt=""><figcaption></figcaption></figure>

<figure><img src="/files/xkKUIWKWp4nlk67wk9Wb" alt=""><figcaption></figcaption></figure>


# Templates

{% stepper %}
{% step %}

### Add intro template

Click **Select a template style** to choose a template for the first 3 seconds of your video. Preview each option to find the right fit, then edit the text directly. Your changes will appear in the live preview in real time.

<figure><img src="/files/dONCilGNHvf17XlUgWuL" alt=""><figcaption></figcaption></figure>

<figure><img src="/files/CTlIow5UpgaAvaQciSDL" alt=""><figcaption></figcaption></figure>

<figure><img src="/files/vYaYJeULgU6N62xNPJrb" alt=""><figcaption></figcaption></figure>
{% endstep %}

{% step %}

### Add outro template

Click **Select a template style** to choose a template for the last 3 seconds of your video. Adjust your **Profile Photo**, **Brand Logo**, and **Outro Text** as needed.

To save time on future videos, use a Brand Kit to store and reuse your branding information automatically. [Learn more about Brand Kits here.](/creating-a-video/how-to-create-a-video/create-a-branded-video/brand-kits)

<figure><img src="/files/lRJSlwXh8t7xkKK8d4X3" alt=""><figcaption></figcaption></figure>

<figure><img src="/files/oEYKG4PQVTuigePVsRdk" alt=""><figcaption></figcaption></figure>

<figure><img src="/files/hE0iIMUUawOFi2qC6QvX" alt=""><figcaption></figcaption></figure>
{% endstep %}
{% endstepper %}


# Brand kits

Brand Kits let you save all of your branding information in one place so it's ready to go whenever you need it.

Why this matters:

* **Save time, every video:** No more filling in the same fields over and over. Set it once, use it everywhere.
* **Stay consistent:** Your contact info, profile photo, and logo are always accurate and on-brand.
* **Manage multiple profiles:** Running videos for multiple agents or brands? Create separate Brand Kits for each one and switch between them instantly.

{% stepper %}
{% step %}

### Create a new brand kit

There are two ways to create a Brand Kit:

1. **From the video settings:** Navigate to **Templates → Outro**, then click **Brand Kit** and select **Create New Brand Kit**.

   <figure><img src="/files/sPiBYcwAXdZ3CMtfkv9R" alt="" width="375"><figcaption></figcaption></figure>
2. **From the dashboard:** Click **Brand Kits** in the main sidebar to open Brand Kit settings and create one from there.

<figure><img src="/files/wAT7v28eVmaLsH9OWHjb" alt="" width="327"><figcaption></figcaption></figure>
{% endstep %}

{% step %}

### Enter brand kit information

For each Brand Kit, you can store:

* **Name**
* **Email**
* **Phone number**
* **Profile photo**
* **Brand logo**

You can create as many Brand Kits as you need, perfect if you manage videos for multiple agents, teams, or brands.

<figure><img src="/files/DHkuZIuNzrSGXzkEW1yT" alt=""><figcaption></figcaption></figure>

{% endstep %}

{% step %}

### Set a default

Once you've created a Brand Kit, you can mark it as your **default**. When a Brand Kit is set as default, it will be automatically applied every time you start a new video, no extra clicks required.
{% endstep %}

{% step %}

#### **Use it in your video** <a href="#id-3-use-it-in-your-video" id="id-3-use-it-in-your-video"></a>

When you're in the **video settings page**, navigate to the **Outro** section. You'll see a Brand Kit selector there. If you've set a default, it'll already be selected.&#x20;

From there, AutoReel automatically pulls in:

* Your name, email, and phone number for the outro.
* Your profile photo and brand logo.

<figure><img src="https://www.blog.autoreelapp.com/content/images/2026/03/data-src-image-e0011826-ce8b-412d-af8e-b64a70eb13ec.png" alt="" width="563"><figcaption></figcaption></figure>

You can always **switch Brand Kits**, **update an existing one**, or **create a new one** right from this screen. And if you only want to use some of the info, no problem. Everything is customizable.

<figure><img src="https://www.blog.autoreelapp.com/content/images/2026/03/data-src-image-e580c70c-5ffb-47af-82d5-14c422be8d0b.png" alt="" width="375"><figcaption></figcaption></figure>
{% endstep %}
{% endstepper %}


# Music

Click **Music** in the sidebar to add audio to your video. Choose from our library of royalty-free tracks across multiple categories, safe to post anywhere without copyright issues. Click the **Play** button on any track to preview it before adding it to your video.

To use your own audio, click **Upload Audio** to upload a track from your device. Once uploaded, it will appear under **My Tracks**.

Select any track to match the vibe of your video.

<figure><img src="/files/YIbodzoMuBaZjMefVUvx" alt=""><figcaption></figcaption></figure>

<figure><img src="/files/ISr018MTFthwehufdkuq" alt=""><figcaption></figcaption></figure>


# Voiceovers & avatars

{% stepper %}
{% step %}

### Select a voice

Click **Select a Voice** to browse the voice library. Choose from a range of male and female voices across different accents, tones, and energy levels. Press the **Play** button to preview any voice before selecting it. Click on the Voice and then **Confirm** to use it for the voiceover.

<figure><img src="/files/AJQ1uhWQ7dre5BcMiwCs" alt=""><figcaption></figcaption></figure>

<figure><img src="/files/YQHjQfep98f3gR5nzM9d" alt="" width="375"><figcaption></figcaption></figure>
{% endstep %}

{% step %}

### (Optional) Select an avatar

Click **Select an Avatar** to choose from our library of male and female avatars, or use your own photo. To use a custom photo, click **My Images**, upload your photo, and select it from there.

> ⚠️ **Heads up:** Selecting a library avatar will override the voice chosen in Step 1. If using your own photo, make sure the gender of the avatar matches the voice you selected.

<figure><img src="/files/yR3wji73dA5HCCiwKAe9" alt=""><figcaption></figcaption></figure>

<figure><img src="/files/w0LzV7RhYLp7gBa9j5ES" alt=""><figcaption></figcaption></figure>

<figure><img src="/files/OfcRmRIwro2BYO5qGHS0" alt=""><figcaption></figcaption></figure>
{% endstep %}

{% step %}

### Write the video script

Type your script manually, or click **Generate Script** to let AI write it for you. Review your property details for context, then click **Confirm**. AutoReel will analyze the property information and every photo in your video to generate a natural voiceover script.

<figure><img src="/files/gz01uk2pV3LCee257KH4" alt=""><figcaption></figcaption></figure>

<figure><img src="/files/frf7zvAv1EtjFJqyvxPg" alt="" width="375"><figcaption></figcaption></figure>

<figure><img src="/files/KHf3LY9aZZADpRFcgBTP" alt=""><figcaption></figcaption></figure>
{% endstep %}
{% endstepper %}


# Clone Your Voice for Narration

Clone your voice and use it in your property videos in just a few steps.

**How-To Video (2 minutes)**

{% embed url="<https://www.youtube.com/watch?v=XXOoh5wkKuM>" %}

## Step By Step Guide

{% stepper %}
{% step %}

### Start a New Project (or Edit Existing Video)

Open AutoReel and create a new project. Type in your property address as the project name, then upload your listing photos.

If you have already created a property video you want to add the voiceover to, proceed to step 3 by clicking "Edit" > "Quick Edit".
{% endstep %}

{% step %}

### Enable Branded Video

<figure><img src="/files/yAJJdFSMHzTSLFgp4tXU" alt="" width="375"><figcaption></figcaption></figure>

On the video settings page, make sure the Branded Video option is checked. This is where you pick your custom voiceover.
{% endstep %}

{% step %}

### Go to Voiceovers

<figure><img src="/files/UVaHD771GpHBOjq83SZY" alt=""><figcaption></figcaption></figure>

On the Branding step, click Voiceovers and Avatar > Select a Voice. Click under the "My Voices" tab where you'll see a list of your cloned voices and a button to Clone a new voice – click it.

<figure><img src="/files/Uqfr8UEttcMnWmlVm2Xj" alt="" width="375"><figcaption></figcaption></figure>
{% endstep %}

{% step %}

### Clone Your Voice

<figure><img src="/files/vOy1SQYnoePIFQpP6Y4p" alt=""><figcaption></figcaption></figure>

<figure><img src="/files/8GsgXYwQTyom4Pgc25jj" alt=""><figcaption></figcaption></figure>

You have two options. You can record yourself reading the script right in your browser, or you can upload an audio file of yourself reading the script.

💡 **Tips for best results:**

* Record in a quiet room
* Speak at a normal, relaxed pace
* Use a good microphone if you have one
  {% endstep %}

{% step %}

### Save Your Voice

<figure><img src="/files/gcYsyDCfXcy4bDssJHRJ" alt=""><figcaption></figcaption></figure>

Give your voice a name, confirm you have the right to use it, and click Next. It takes about 20 to 30 seconds to process.
{% endstep %}

{% step %}

### Add Script and Render

Select your cloned voice, type your script or let AutoReel write one for you, then click Render. Your video will be ready in minutes.
{% endstep %}
{% endstepper %}


# Video Effects (VFX)

Add cinematic visual effects to your property videos with just a few clicks.

## Video Walkthrough (2 minutes)

{% embed url="<https://www.youtube.com/watch?v=Pgi--M8UexA>" %}

## What VFX effects are available?

<figure><img src="/files/47L0AHnNV9MFJ5LclHot" alt=""><figcaption></figcaption></figure>

AutoReel currently offers 15 effects to choose from:

<table><thead><tr><th width="187.2265625">Video Effect (VFX)</th><th width="465.26953125">Description</th></tr></thead><tbody><tr><td><strong>Day to Dusk</strong></td><td>Transforms the lighting in a daytime shot into a twilight timelapse video clip.</td></tr><tr><td><strong>Sunshine</strong></td><td>Transforms the lighting in a shot into a morning (dawn) to day time time-lapse video clip</td></tr><tr><td><strong>Starry Night</strong></td><td>Transforms a daytime shot into a star-filled night sky timelapse.</td></tr><tr><td><strong>Pencil Sketch</strong></td><td>Gives your photo an artistic, illustrated look.</td></tr><tr><td><strong>Virtual Staging</strong></td><td>Animates a staged/furnished room, transitioning from an empty room into a fully furnished space.</td></tr><tr><td><strong>Lifestyle</strong></td><td>Adds a lived-in, warm feel to scenes to help envision life in the scene.</td></tr><tr><td><strong>3D Gold Text Drop</strong></td><td>Adds flashy 3D gold text to the front of the home.</td></tr><tr><td><strong>Spin Ceiling Fan</strong></td><td>Animates the ceiling fan blades to bring the room to life.</td></tr><tr><td><strong>Static Ceiling Fan</strong></td><td>Keeps the ceiling fan perfectly still in the shot.</td></tr><tr><td><strong>Shadows</strong></td><td>Casts soft, moving shadows across the scene.</td></tr><tr><td><strong>Sway Trees</strong></td><td>Gently sways the outdoor trees and foliage in the breeze.</td></tr><tr><td><strong>House Drop</strong></td><td>Drops the house into its lot for a playful reveal.</td></tr><tr><td><strong>Construction</strong></td><td>Shows the home being built in a construction timelapse.</td></tr></tbody></table>

## **Adding VFX to a New Video**

{% stepper %}
{% step %}

### **Step 1: Start a New Project**

Open AutoReel and create a new project. Type in your property address as the project name, then upload your listing photos.
{% endstep %}

{% step %}

### **Step 2: Select Your Photos**

<figure><img src="/files/WwlKQMLoUkGcS8C1eUqR" alt=""><figcaption></figcaption></figure>

Choose the photos you want to use. For each photo you want to apply an effect to, you will see a VFX option next to it.
{% endstep %}

{% step %}

### **Step 3: Pick Your Effect**

<figure><img src="/files/fEOQrTr0pD22P6dQrVcU" alt="" width="375"><figcaption></figcaption></figure>

Click on VFX for the clip you want to enhance and select the effect that fits the scene.
{% endstep %}

{% step %}

### **Step 4: Render Your Video**

Once you have your effects selected, go ahead and click Render. Your video will be ready in a few minutes.
{% endstep %}
{% endstepper %}

## **Adding VFX to a Video You Already Made**

If you have already created a video and just want to add an effect to it, you do not need to start over.

{% stepper %}
{% step %}

### **Step 1: Open Your Existing Video**

Find the video you want to update and click Edit > Quick Edit.
{% endstep %}

{% step %}

### **Step 2: Select the Clip You Want to Update**

<figure><img src="/files/ygCg2ss21ZasJfwDgZ4e" alt=""><figcaption></figcaption></figure>

Click on the clip you want to apply an effect to and select VFX.
{% endstep %}

{% step %}

### **Step 3: Pick Your Effect and Re-render**

Choose your effect and click Render. Everything else in your video stays the same. If you are not happy with how a clip came out, you can redo it up to 2 times.
{% endstep %}
{% endstepper %}

## **A Few Things to Keep in Mind**

VFX is a brand new experimental feature and we are still improving it. Here are a few tips to get the best results:

* Try to match the effect to the right type of scene.&#x20;
  * Using a timelapse effect on an exterior scene will give a great result
  * Using a staging effect on an exterior shot, for example, may not give you the result you expect.
* If a clip does not come out the way you wanted, use the redo option to generate it again. Results can vary slightly each time.
* Low resolution images may appear grainy when a VFX effect is applied. For best results, use high quality photos in full resolution.

**How many VFX can I use?**

Depending on your plan, you get up to 7 VFX clips per video when creating a new project. For Quick Edits on existing videos, you can edit up to 6 VFX clips per video.

Each VFX clip is generated by a powerful AI video model that runs in real time, which takes significant computing resources to produce. We set these limits so every AutoReel user gets fast, reliable results without long wait times or degraded quality. We wanted to keep VFX included in every plan at no extra charge, and these limits are what make that possible.


# Speed ramps

Speed ramps automatically vary the playback speed of your video to add a cinematic feel.

<figure><img src="/files/IwRpmOh0VtIdiISl5y6F" alt=""><figcaption></figcaption></figure>

#### **Why this matters:**

* **Stop the scroll:** Dynamic motion makes viewers pause instead of swiping past.
* **Look modern instantly:** Your reels feel like premium content, not a slideshow.
* **Impress sellers:** Show up with the same production quality as top creators.

{% stepper %}
{% step %}

### Create a new video, or edit an existing video

Start a new project, upload your listing photos, and create an unbranded video as usual. Or, click **Quick Edit** on any existing video.&#x20;
{% endstep %}

{% step %}

### Enable Speed Ramps

In the **Branded Settings** page, under **Templates,** click on **Full Video.** Then, enable **Speed Ramps.**

<figure><img src="/files/yHII8szCvdGBE0vO2NZu" alt=""><figcaption></figcaption></figure>
{% endstep %}

{% step %}

### Render video

That's it! Click **Render** when you're done adding your remaining branding settings, and the video will be done in minutes.
{% endstep %}
{% endstepper %}


# Beat sync

Automatically sync your video to the beat of the music for a more engaging feel.

**Why this matters:**

* **Keep viewers watching:** Music and video moving together makes the video feel alive.
* **Look professionally edited:** Your cuts land on the beat, like a real editor sat down and timed them.
* **Premium in one click:** No manual timing, no editing software. Just toggle it on.

{% stepper %}
{% step %}

### Create a new video, or edit an existing video

Start a new project, upload your listing photos, and create an unbranded video as usual. Or, click **Quick Edit** on any existing video.&#x20;
{% endstep %}

{% step %}

### Enable Beat Sync

In the **Branded Settings** page, navigate to to **Templates tab > Full Video >** toggle **Beat Sync.** Or, toggle it right below the live video preview once a music track is selected.

<figure><img src="/files/z7WmiSECbMedJYQ5o8tO" alt=""><figcaption></figcaption></figure>
{% endstep %}

{% step %}

### Choose a song

If you haven't selected a song yet, pick one that best suits the property, location, and vibe for the video.

<figure><img src="/files/GHIFe6Qy3GutJhrebtSf" alt="" width="375"><figcaption></figcaption></figure>
{% endstep %}

{% step %}

### Render video

That's it! Click **Render** when you're done adding your remaining branding settings, and the video will be done in minutes.
{% endstep %}
{% endstepper %}

<br>


# How To: Edit a Video

There are two ways to edit your video:

* **Quick Edit:** Make quick updates to your video. Regenerate or swap clips, reorder them, and make fast updates to your branding settings.
* **Studio:** Get full control over the styling of the video. Customize text, font styles, transitions, add additional clips, and more.

Choose the option that fits your needs.


# Quick Edit

Quick Edit lets you make quick changes in minutes, without creating an entirely new video.

Did your video not turn out right the first time? Quick Edit lets you make quick changes in minutes, without creating an entirely new video. You can redo clips, swap them out, exclude them, reorder them, and update your branding.

## Step by Step Video Walkthrough (2 minutes)

{% embed url="<https://youtu.be/go7arKzIFQU>" %}

> ⚠️ **Heads up:** Redos and swaps are limited to **6 clip updates per video**, as each update uses AI rendering. This limit applies across both redos and swaps combined.

{% stepper %}
{% step %}

### Start a Quick Edit

After the video is done processing, click on **Edit -> Quick Edit** to quickly edit your photos.

<figure><img src="/files/lTtSwHT09GrUKVq1A1Vg" alt=""><figcaption></figcaption></figure>

<figure><img src="/files/YKtMUQqg46Hz5P9sJVM2" alt=""><figcaption></figcaption></figure>
{% endstep %}

{% step %}

### Apply a "Redo"

To redo a clip, click the **Update** button dropdown and select **Redo**. Use this when a clip has AI artifacts or an undesirable camera motion and you want to regenerate it.

<figure><img src="/files/c5vMuOEgPXXutKJC79CE" alt="" width="375"><figcaption></figcaption></figure>
{% endstep %}

{% step %}

### Apply a "Swap"

You can also swap a clip by clicking **Update**, then **Swap**. Select a replacement photo from your project to swap it in.

<figure><img src="/files/3zndwxaoutLzxRuKRdog" alt="" width="375"><figcaption></figcaption></figure>

<figure><img src="/files/tCBTnotTEmACuCfzvyBM" alt="" width="375"><figcaption></figcaption></figure>

<figure><img src="/files/XBS1543jRWRO4uaEWarV" alt="" width="375"><figcaption></figcaption></figure>
{% endstep %}

{% step %}

### Exclude, include, and reorder clips

You can also exclude, include, and reorder clips:

* **Exclude:** Hover over the clip and click the **X** button, then select **Exclude**.
* **Include:** Changed your mind? Click the **Include** button on any excluded clip to add it back.
* **Reorder:** Click and drag any clip to reorder it in the video.

<figure><img src="/files/MvniQdsKozL1luvU94eC" alt="" width="375"><figcaption></figcaption></figure>

<figure><img src="/files/HKFYFFDFmZeNHoFAzqVq" alt="" width="375"><figcaption></figcaption></figure>
{% endstep %}

{% step %}

### Update branding

To update your branding, click into any of the following and make your changes: templates, text, photos, music, avatars, and voiceovers. See the [Branded Video Settings](/creating-a-video/how-to-create-a-video/create-a-branded-video) section to learn more.

<figure><img src="/files/7yEfu20fXRuxocCVEiBB" alt=""><figcaption></figcaption></figure>

{% endstep %}
{% endstepper %}


# Studio

From adding intros and outros to additional video clips, trimming scenes, inserting music, and customizing text — AutoReel Studio gives you complete creative control.

## Step by Step Video Walkthrough (10 minutes)

{% embed url="<https://youtu.be/ZcmZqsOsgDw>" %}

Let’s walk you through how to use it, step by step.👇

### **✨ Step 1: Start with an AutoReel Generated Video** <a href="#e2-9c-a8-step-1-start-with-an-autoreel-generated-video" id="e2-9c-a8-step-1-start-with-an-autoreel-generated-video"></a>

Once AutoReel renders your video from selected photos, you’ll see it under the **Videos** tab on your property page. Use the dropdown to switch between different versions:

* **Original** **Video** (AI-generated base video with no branding)
* **Branded Video** (your AI video with branding)

If you haven’t added any branding yet, only the Original Video version will appear.

<figure><img src="/files/S8fwYxEEdv0XfcIffLIA" alt="" width="375"><figcaption></figcaption></figure>

**🎛️ Step 2: Open AutoReel Studio**

To begin editing, click the **Edit** dropdown and select **Studio**.

<figure><img src="/files/5bLFLkFOeITTAlxyrMuc" alt="" width="375"><figcaption></figcaption></figure>

This opens the full AutoReel Studio interface where you can customize your video timeline, visuals, and more.

### **🎨 Step 3: Choose Your Intro** <a href="#f0-9f-8e-a8-step-3-choose-your-intro" id="f0-9f-8e-a8-step-3-choose-your-intro"></a>

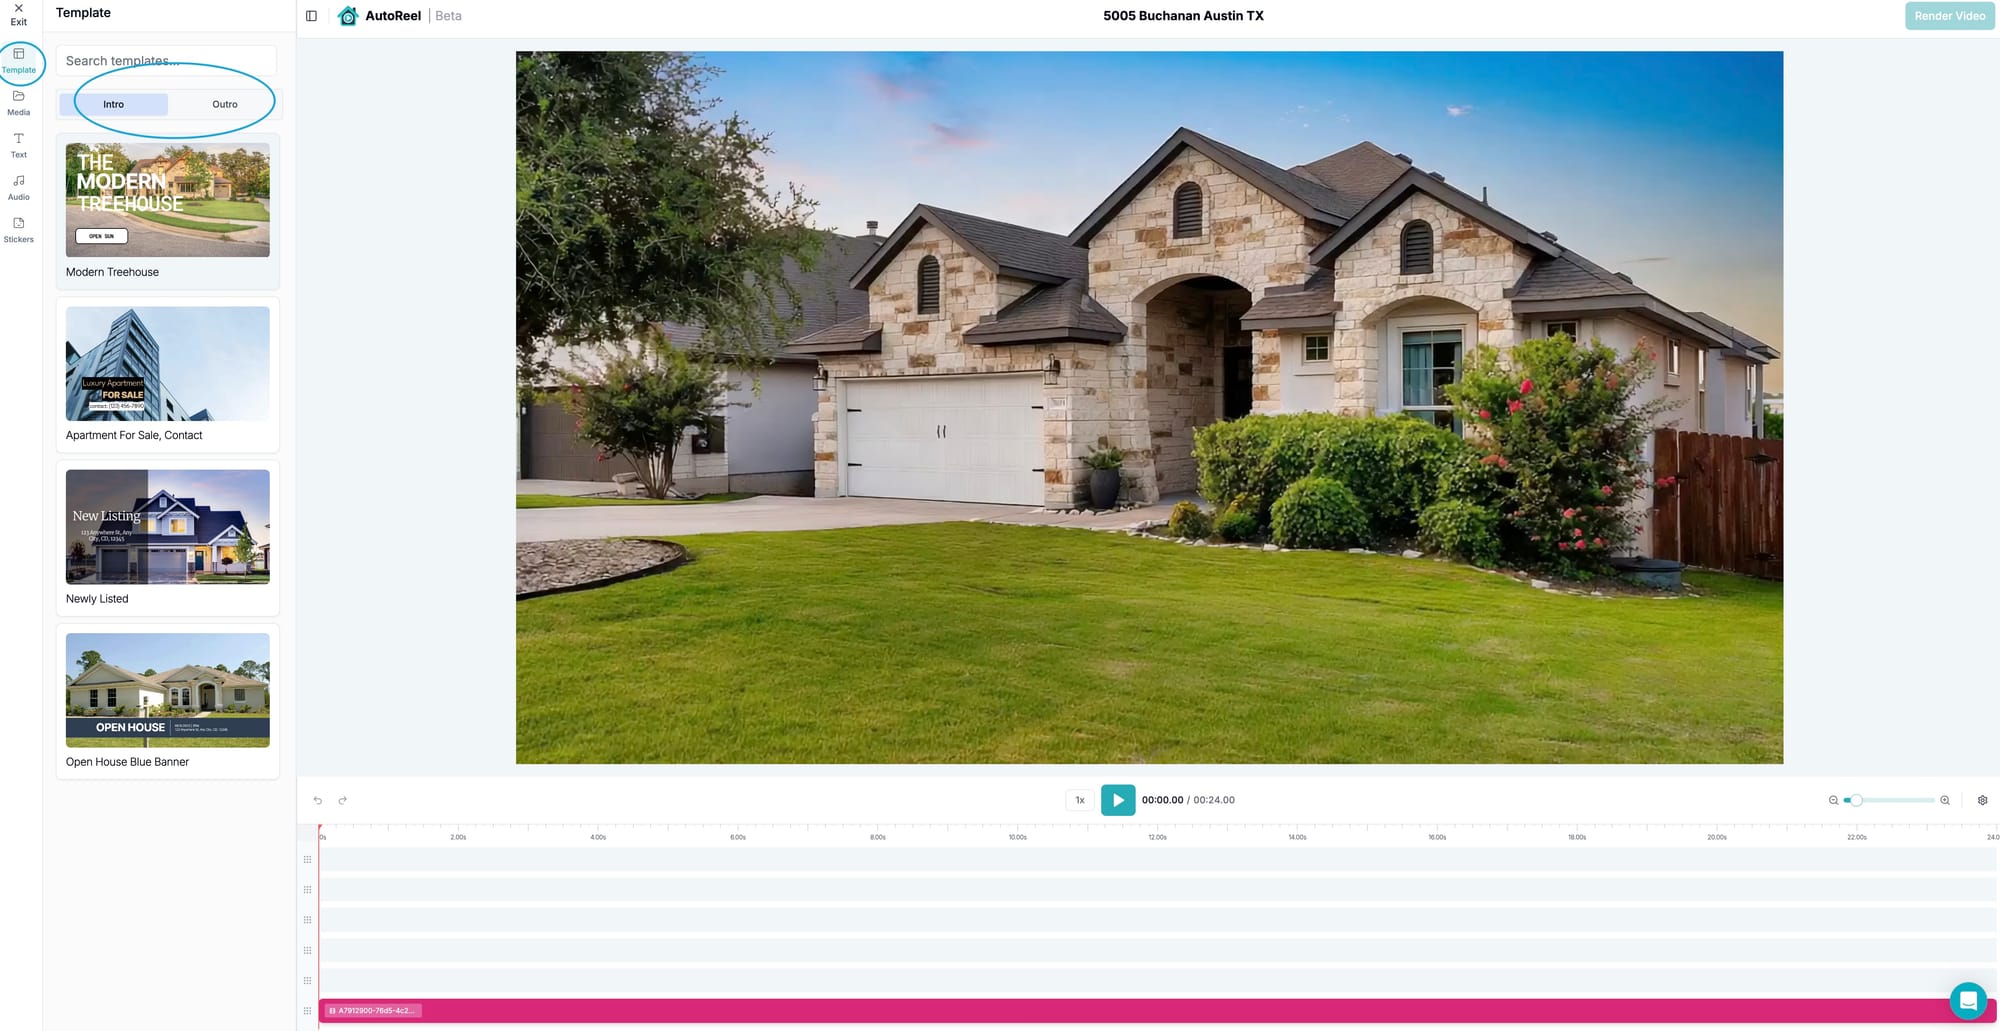
First impressions matter. Add an intro template to the start of your video from our **Template Library** on the left panel.

Use our pre-designed slides to promote open houses, highlight features, or just brand your video. Note that this is just a starting set of templates and we will be launching more new templates soon.

<figure><img src="https://www.blog.autoreelapp.com/content/images/2025/08/template-library.jpg" alt="" width="563"><figcaption><p>Open the intros template library by selecting Templates in the left sidebar.</p></figcaption></figure>

Select an intro template that matches your style and desired look.

<figure><img src="https://www.blog.autoreelapp.com/content/images/2025/08/intro-template.jpg" alt="" width="563"><figcaption></figcaption></figure>

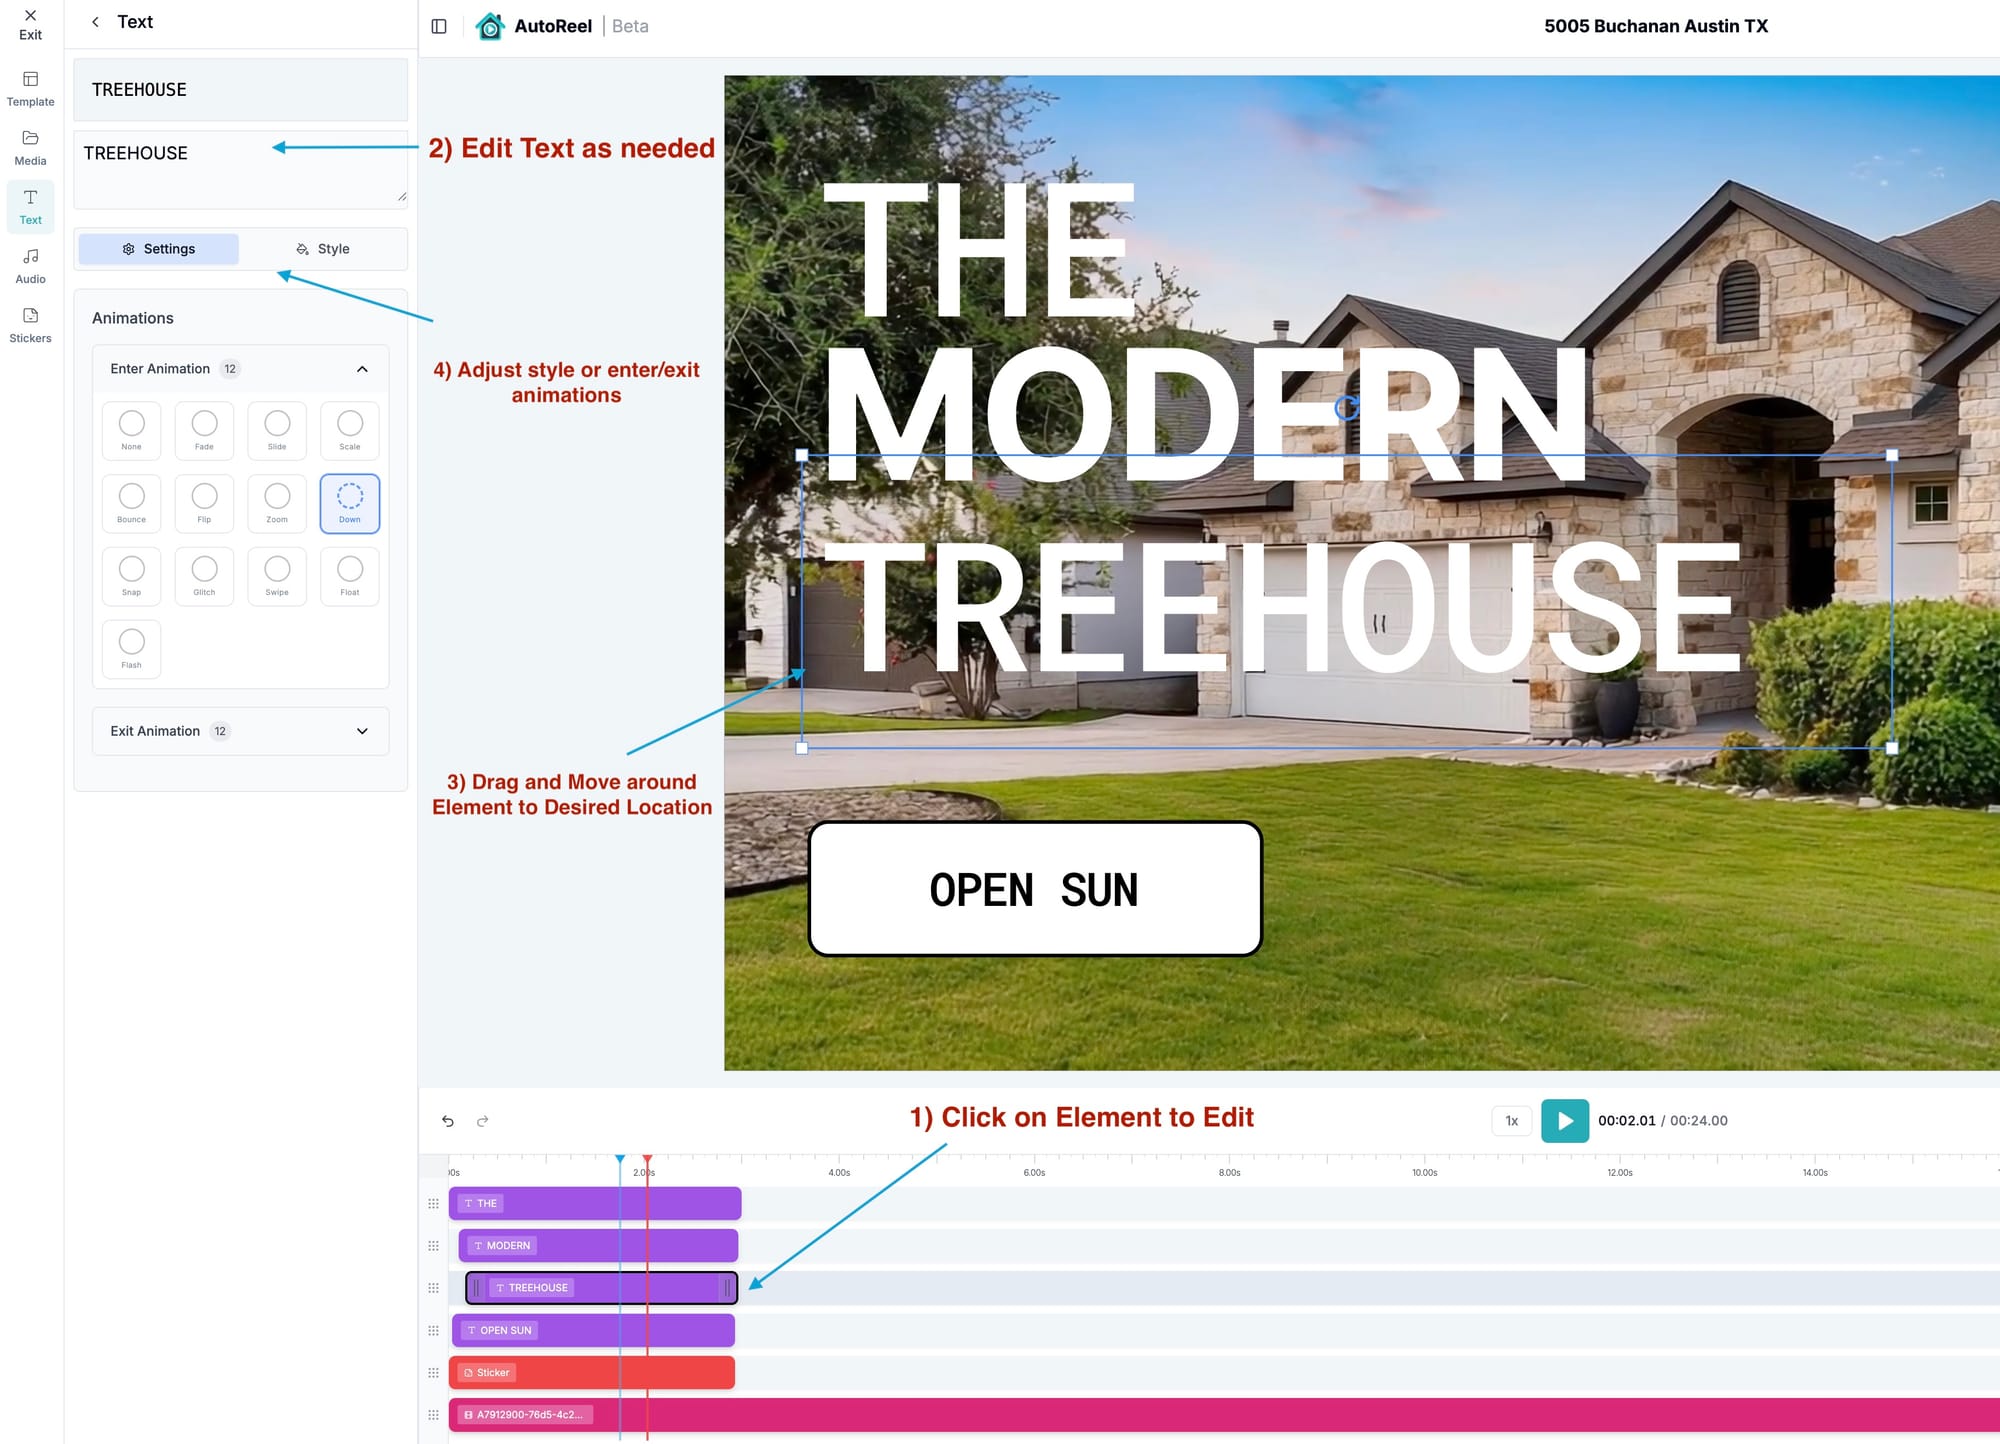
Once you’ve selected your intro template, it’s time to make it yours. Follow these steps to easily customize the text and layout:

1\. Click on the element you want to edit in the timeline (e.g. text like “Treehouse” in the example above).

2\. In the Text panel on the left, update the content to match your listing details — such as the property name, open house timings, or other callout.

3. (Optional) Drag and reposition any text block to your preferred spot on the video preview screen.
4. (Optional) Use the Animations section to customize how text enters and exits — choose from fade, slide, zoom, and more.

This gives you complete control over the look and feel of your intro, so it aligns perfectly with your brand or listing.

### **🏁 Step 4: Add an Outro** <a href="#f0-9f-8f-81-step-4-add-an-outro" id="f0-9f-8f-81-step-4-add-an-outro"></a>

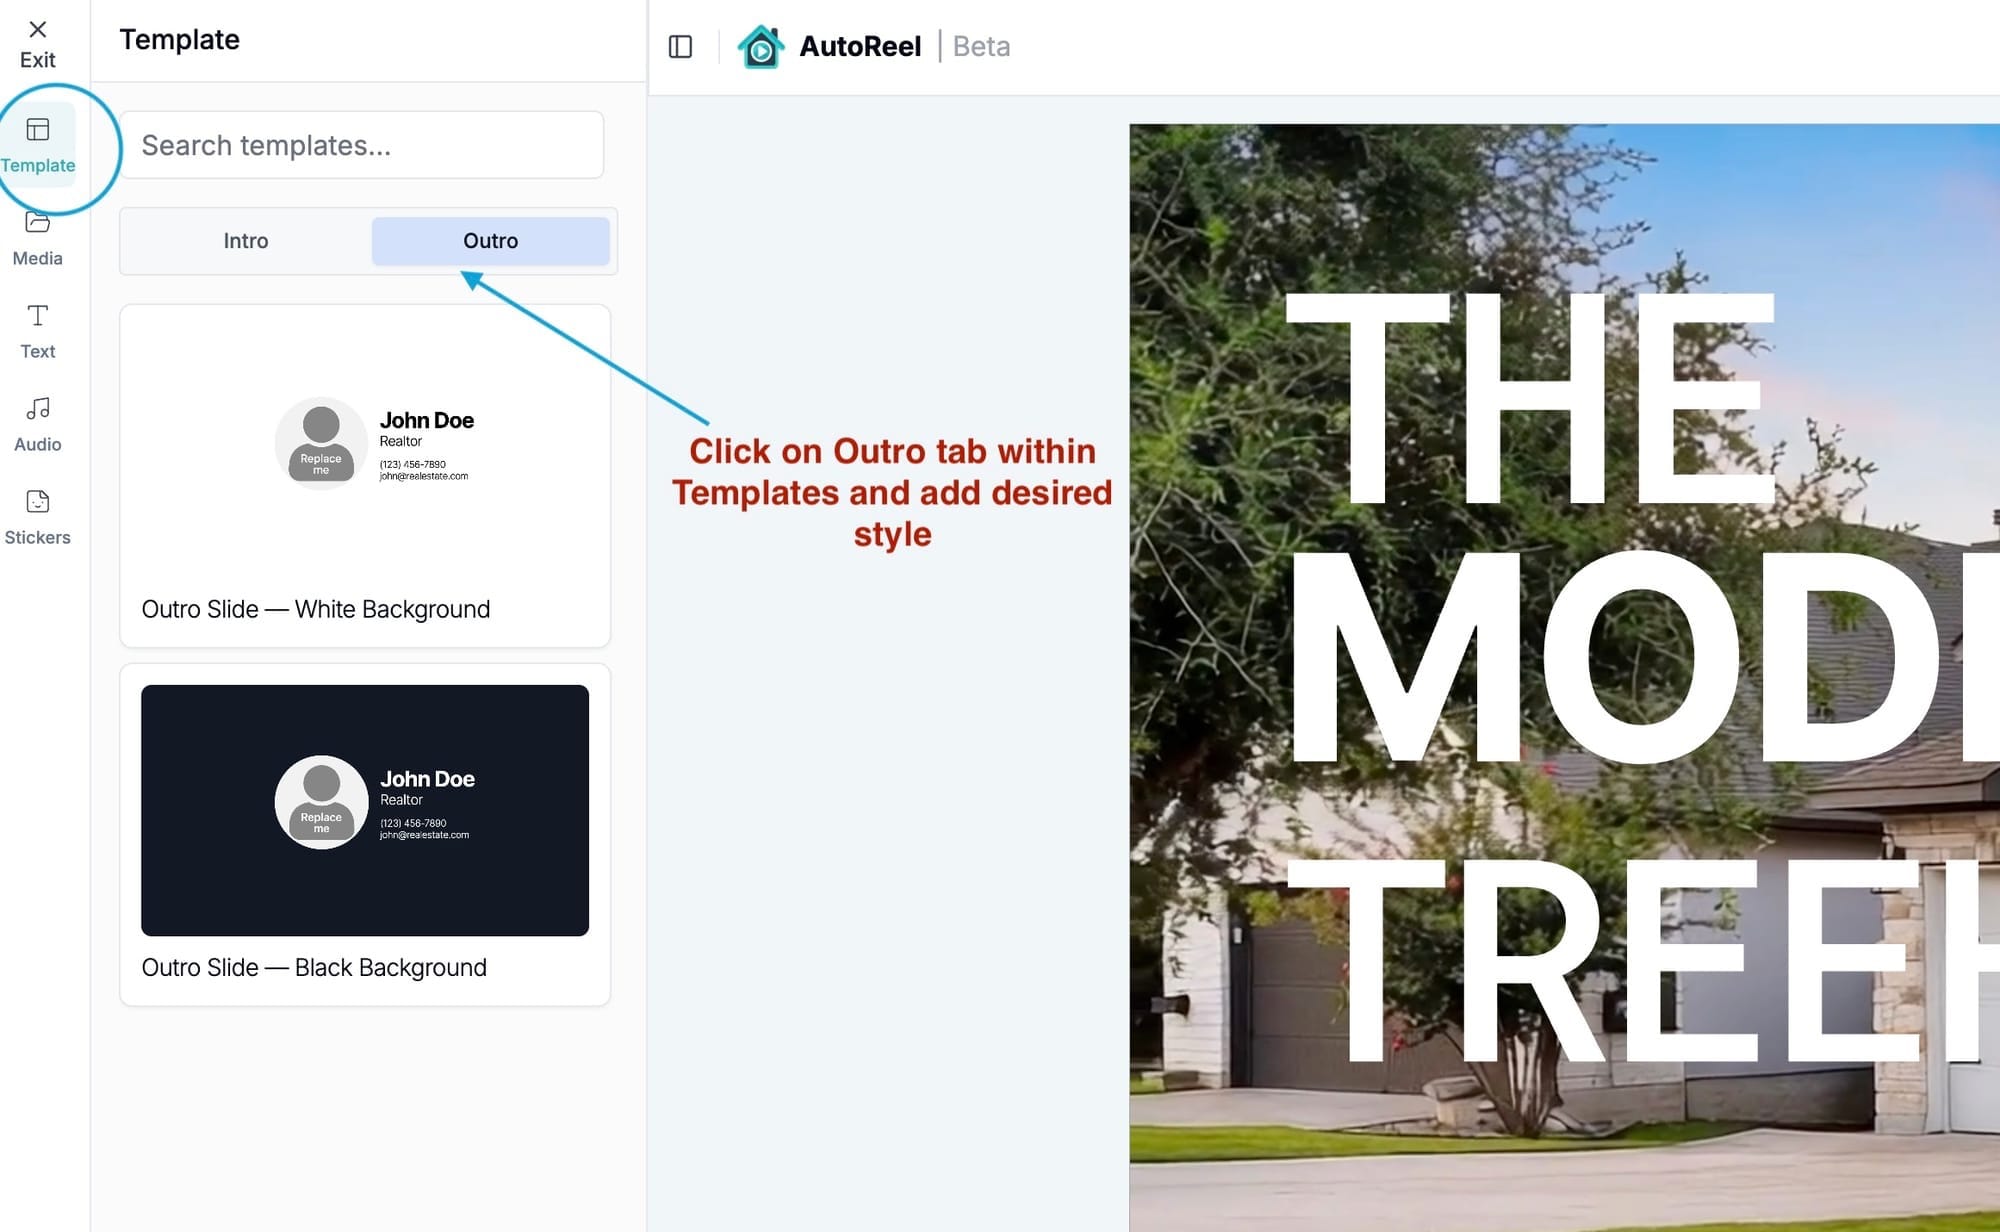
Give your video a strong finish by choosing from our **Outro** templates — great for showing agent details, contact info, or brokerage branding.

Click “Outro” inside the **Template** tab and add your preferred style onto the end of your timeline.

<figure><img src="https://www.blog.autoreelapp.com/content/images/2025/08/outro-templates-1.jpg" alt="" width="563"><figcaption><p>Select an outro by going to Templates > Outro from the left sidebar.</p></figcaption></figure>

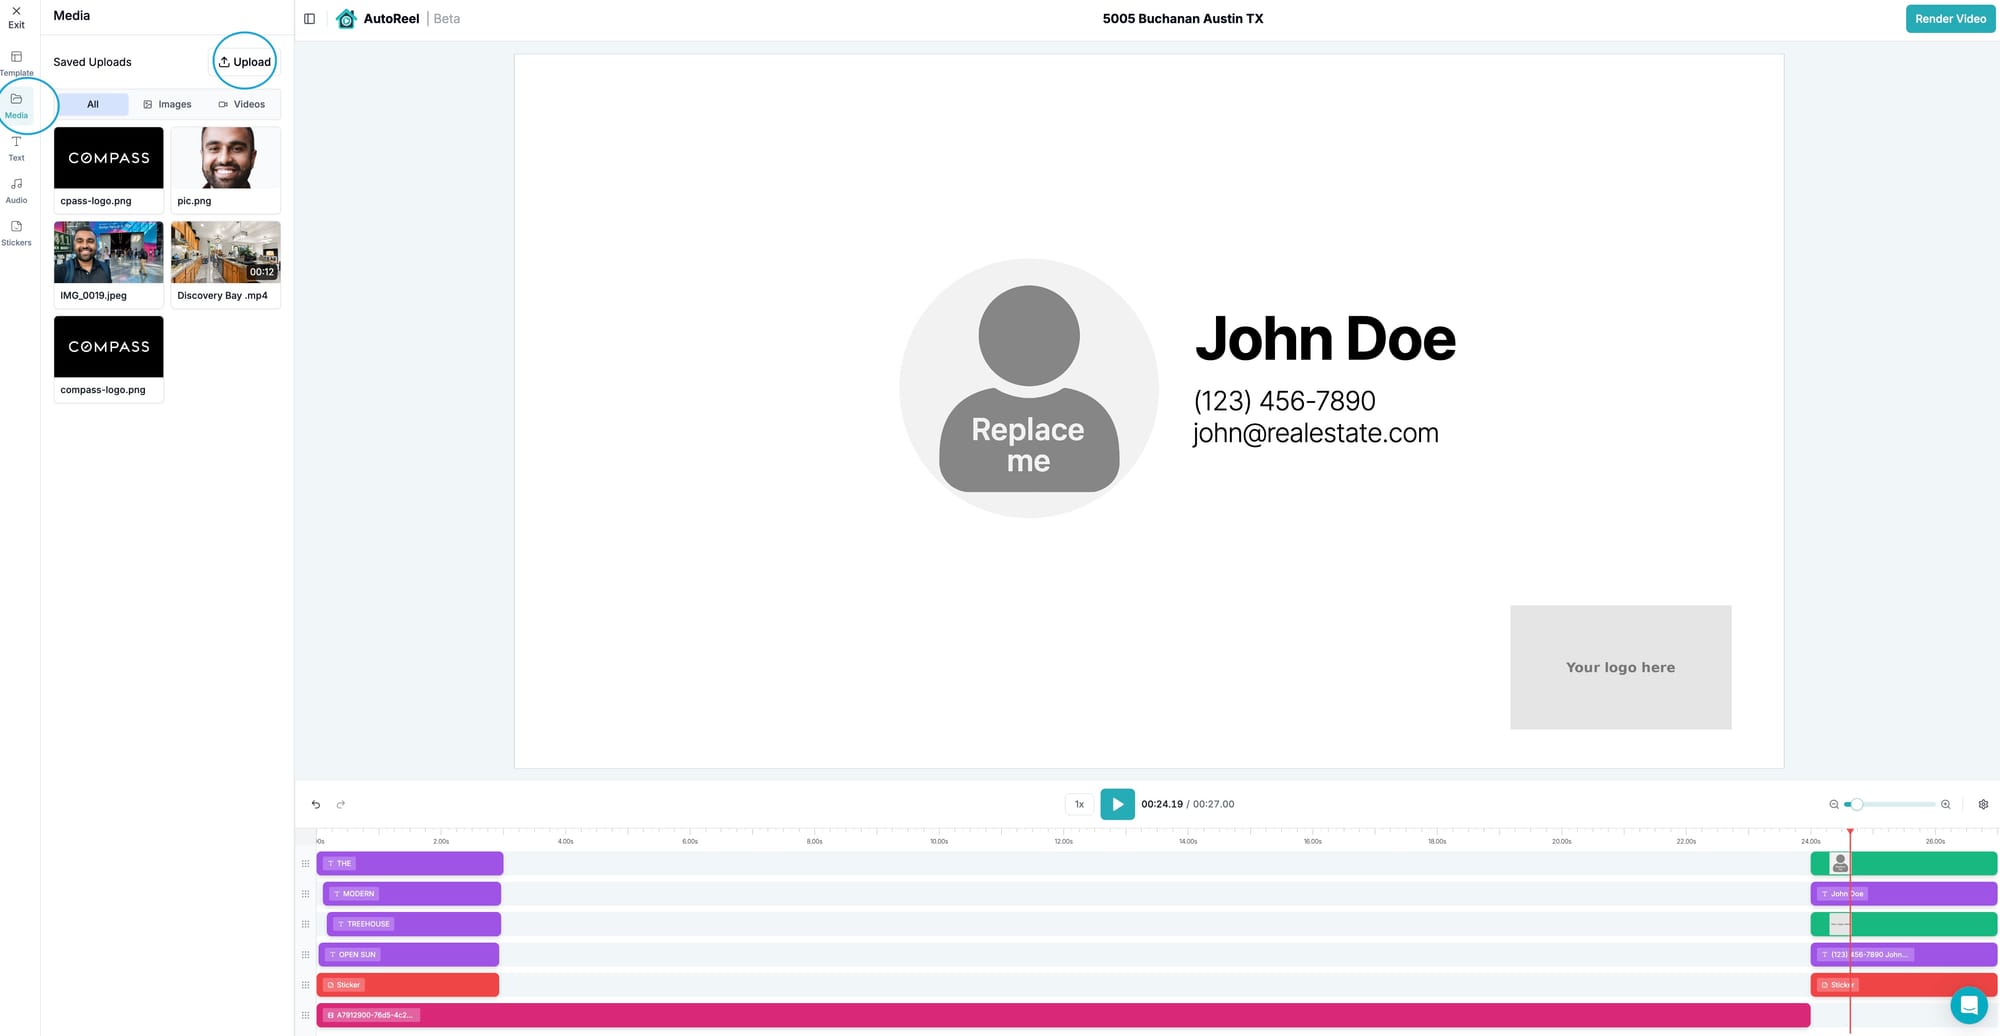
Then, customize the layout by uploading your own profile photo and branding assets as needed, and clicking on them to Add to timeline when prompted.

<figure><img src="https://www.blog.autoreelapp.com/content/images/2025/08/outro-assets.jpg" alt="" width="563"><figcaption><p>Upload your profile photo and branding images to use in the Outro by navigating to the Media tab.</p></figcaption></figure>

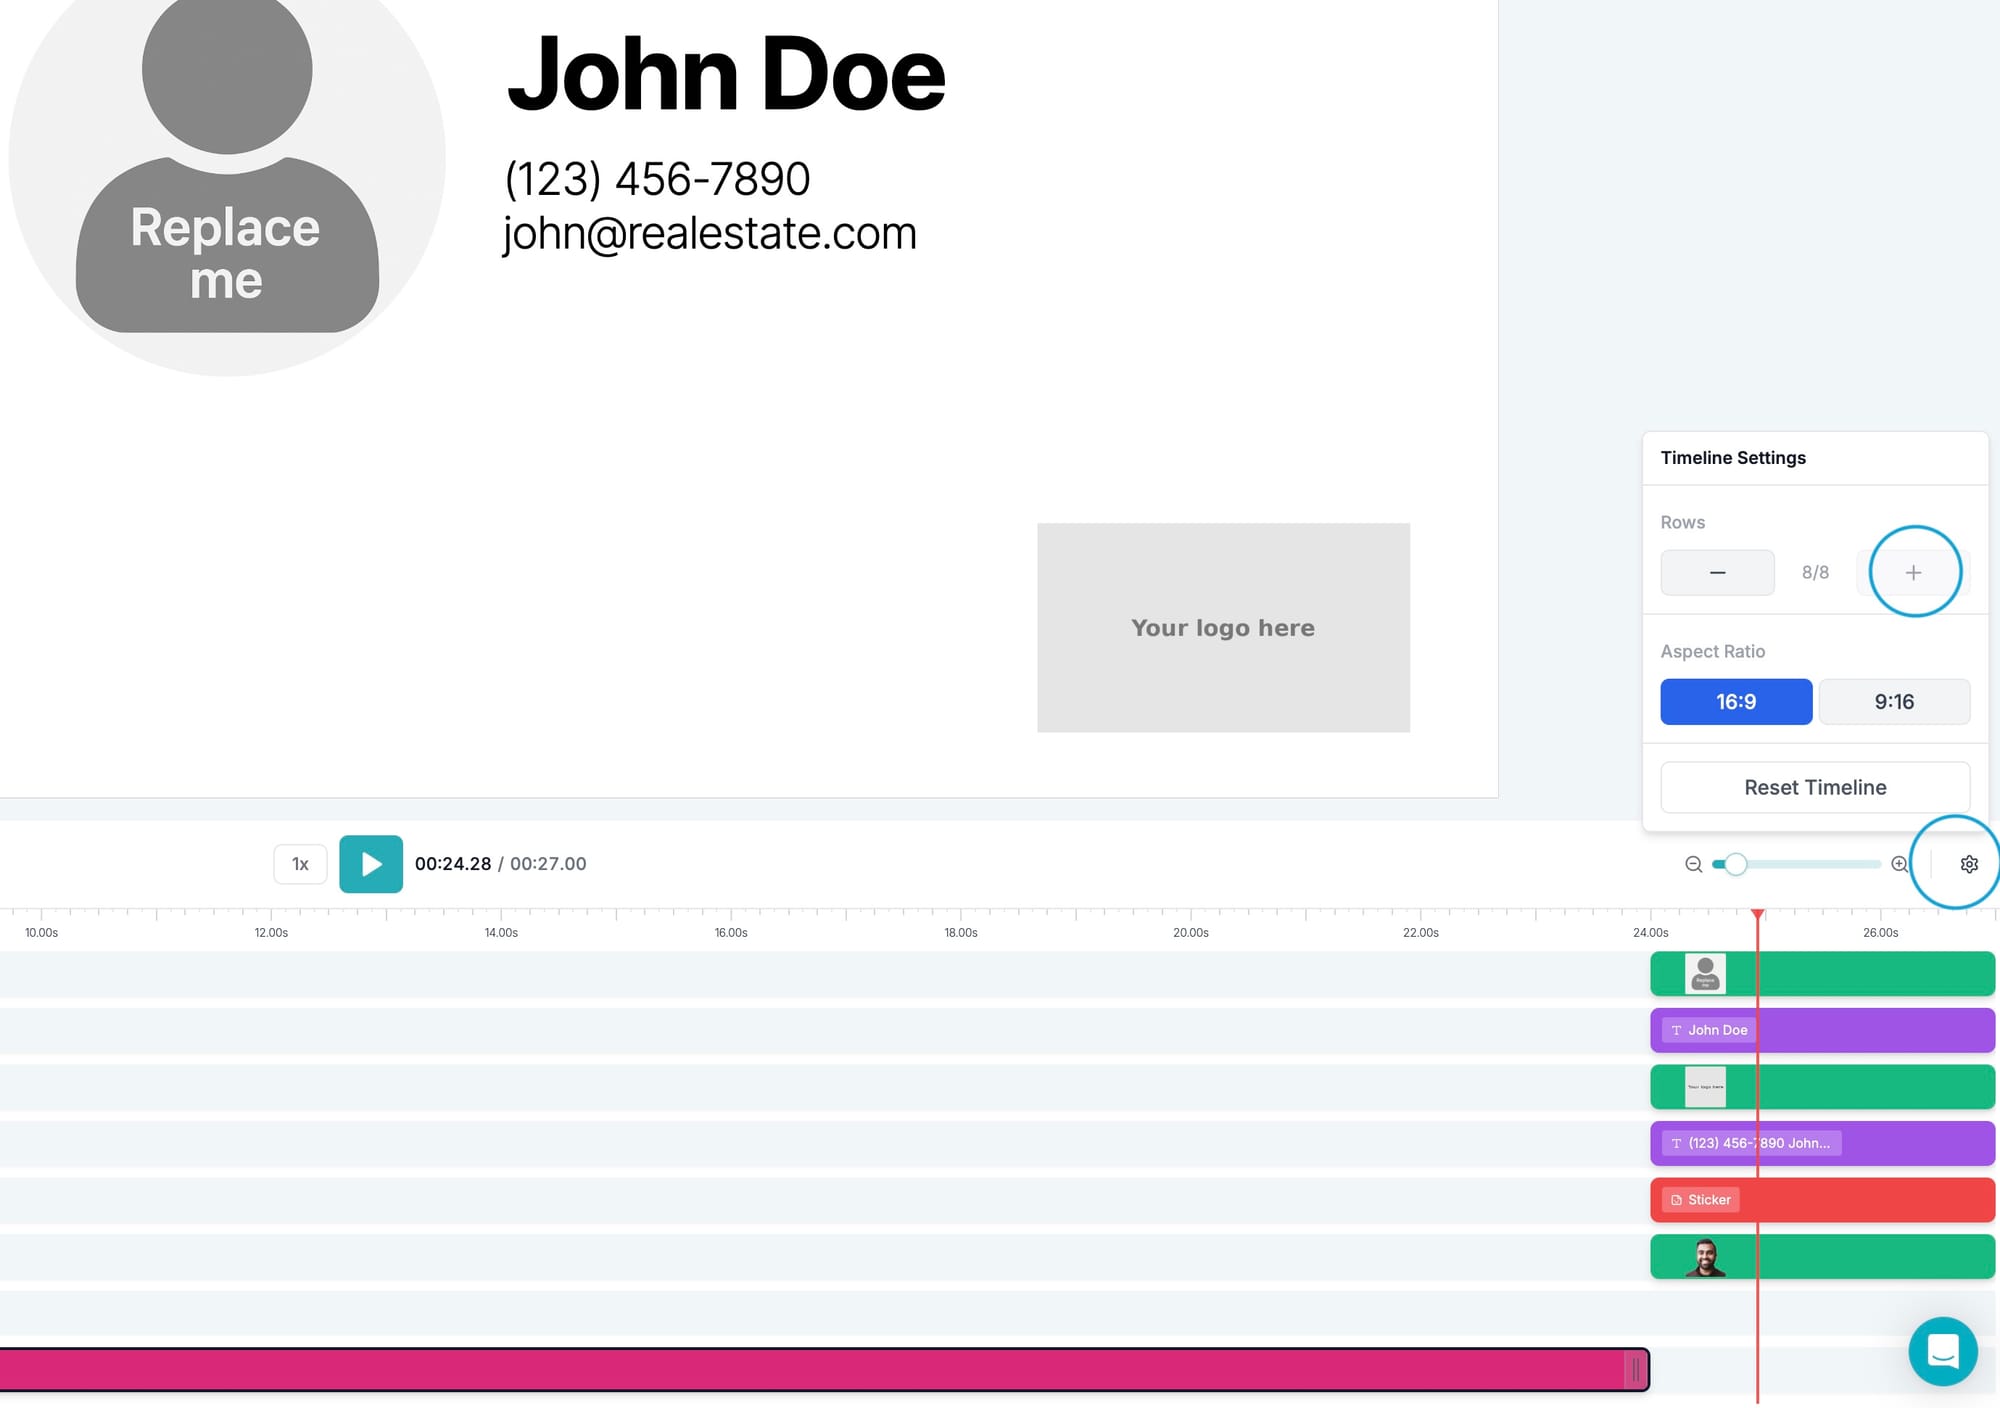
In some cases, you may need to add more rows to the timeline to have room for your newly uploaded assets, which you'll use to replace the template placeholder profile photo and logo. To do so, click the Gear on the right of the player and the "+" plus button to add more rows.

<figure><img src="https://www.blog.autoreelapp.com/content/images/2025/08/add-rows-asset-room.jpg" alt="" width="563"><figcaption><p>Add more rows to your timeline to create space for newly uploaded assets (e.g. profile photo, logo)</p></figcaption></figure>

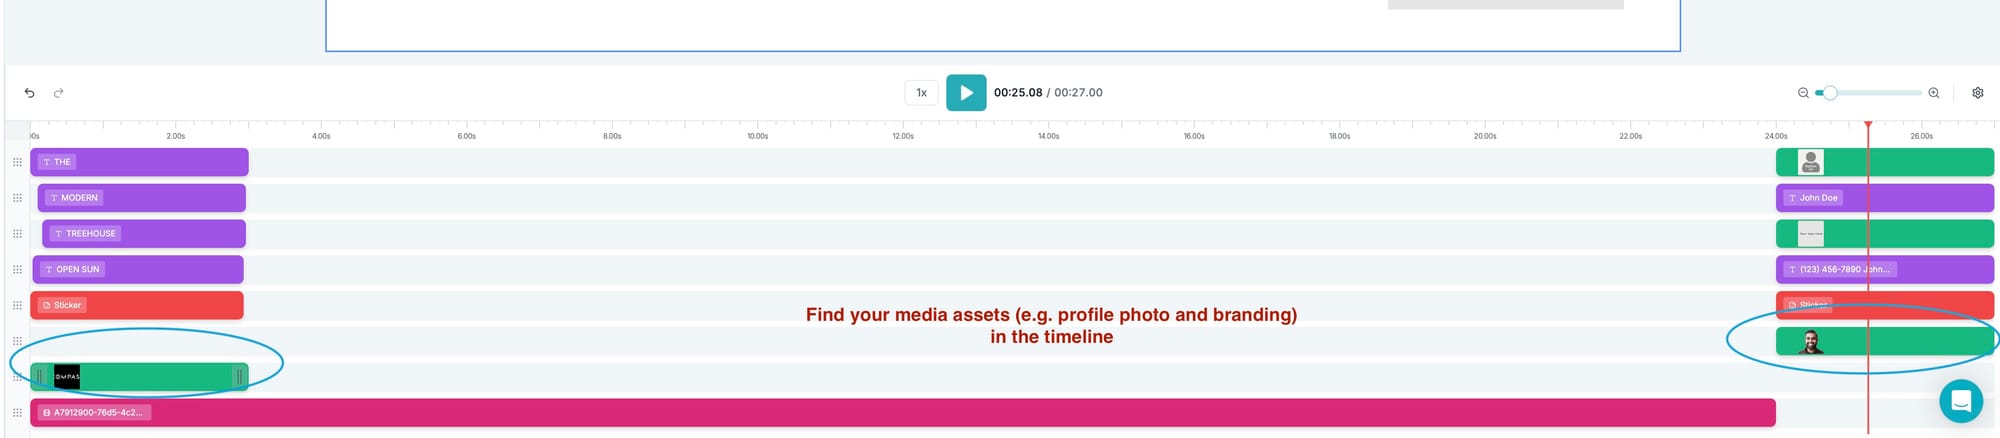
Upon initially adding the photo assets, they will be inserted in the timeline where there's given space, typically either at the beginning or ending:

<figure><img src="https://www.blog.autoreelapp.com/content/images/2025/08/find-assets.jpg" alt="" width="563"><figcaption></figcaption></figure>

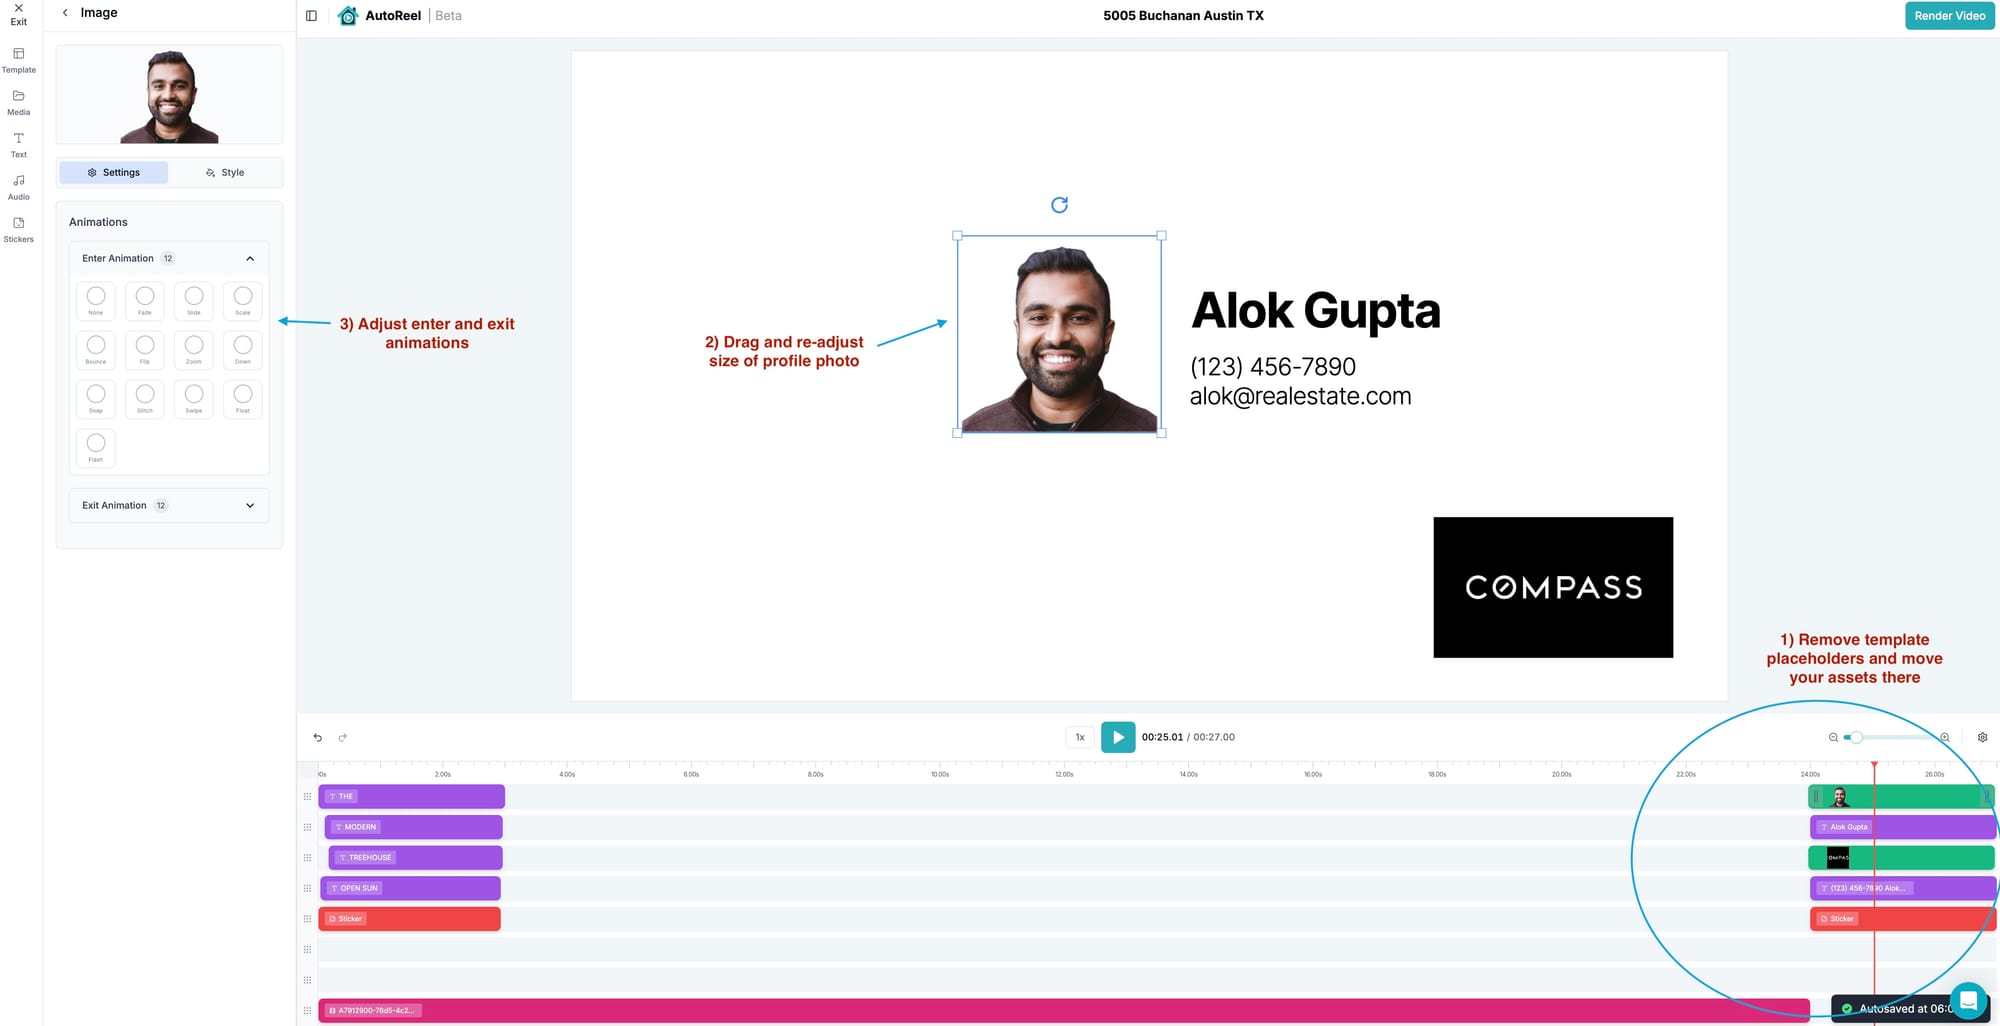
Now, replace the placeholder profile photo and logo assets with your uploaded assets. You can either click on the placeholder elements and press "delete" on your keyboard, or right click on the element to delete it. Drag and reposition your profile photo and logo assets into where the placeholder elements were.

<figure><img src="https://www.blog.autoreelapp.com/content/images/2025/08/adjust-outro-assets.jpg" alt="" width="563"><figcaption></figcaption></figure>

Finalize your Outro details:

* Drag to reposition your profile image
* Replace placeholder info with your name, number, and email
* Swap the logo if needed

### **✏️ Step 5: Add or Edit More Text in the Video** <a href="#e2-9c-8f-ef-b8-8f-step-5-add-or-edit-more-text-in-the-video" id="e2-9c-8f-ef-b8-8f-step-5-add-or-edit-more-text-in-the-video"></a>

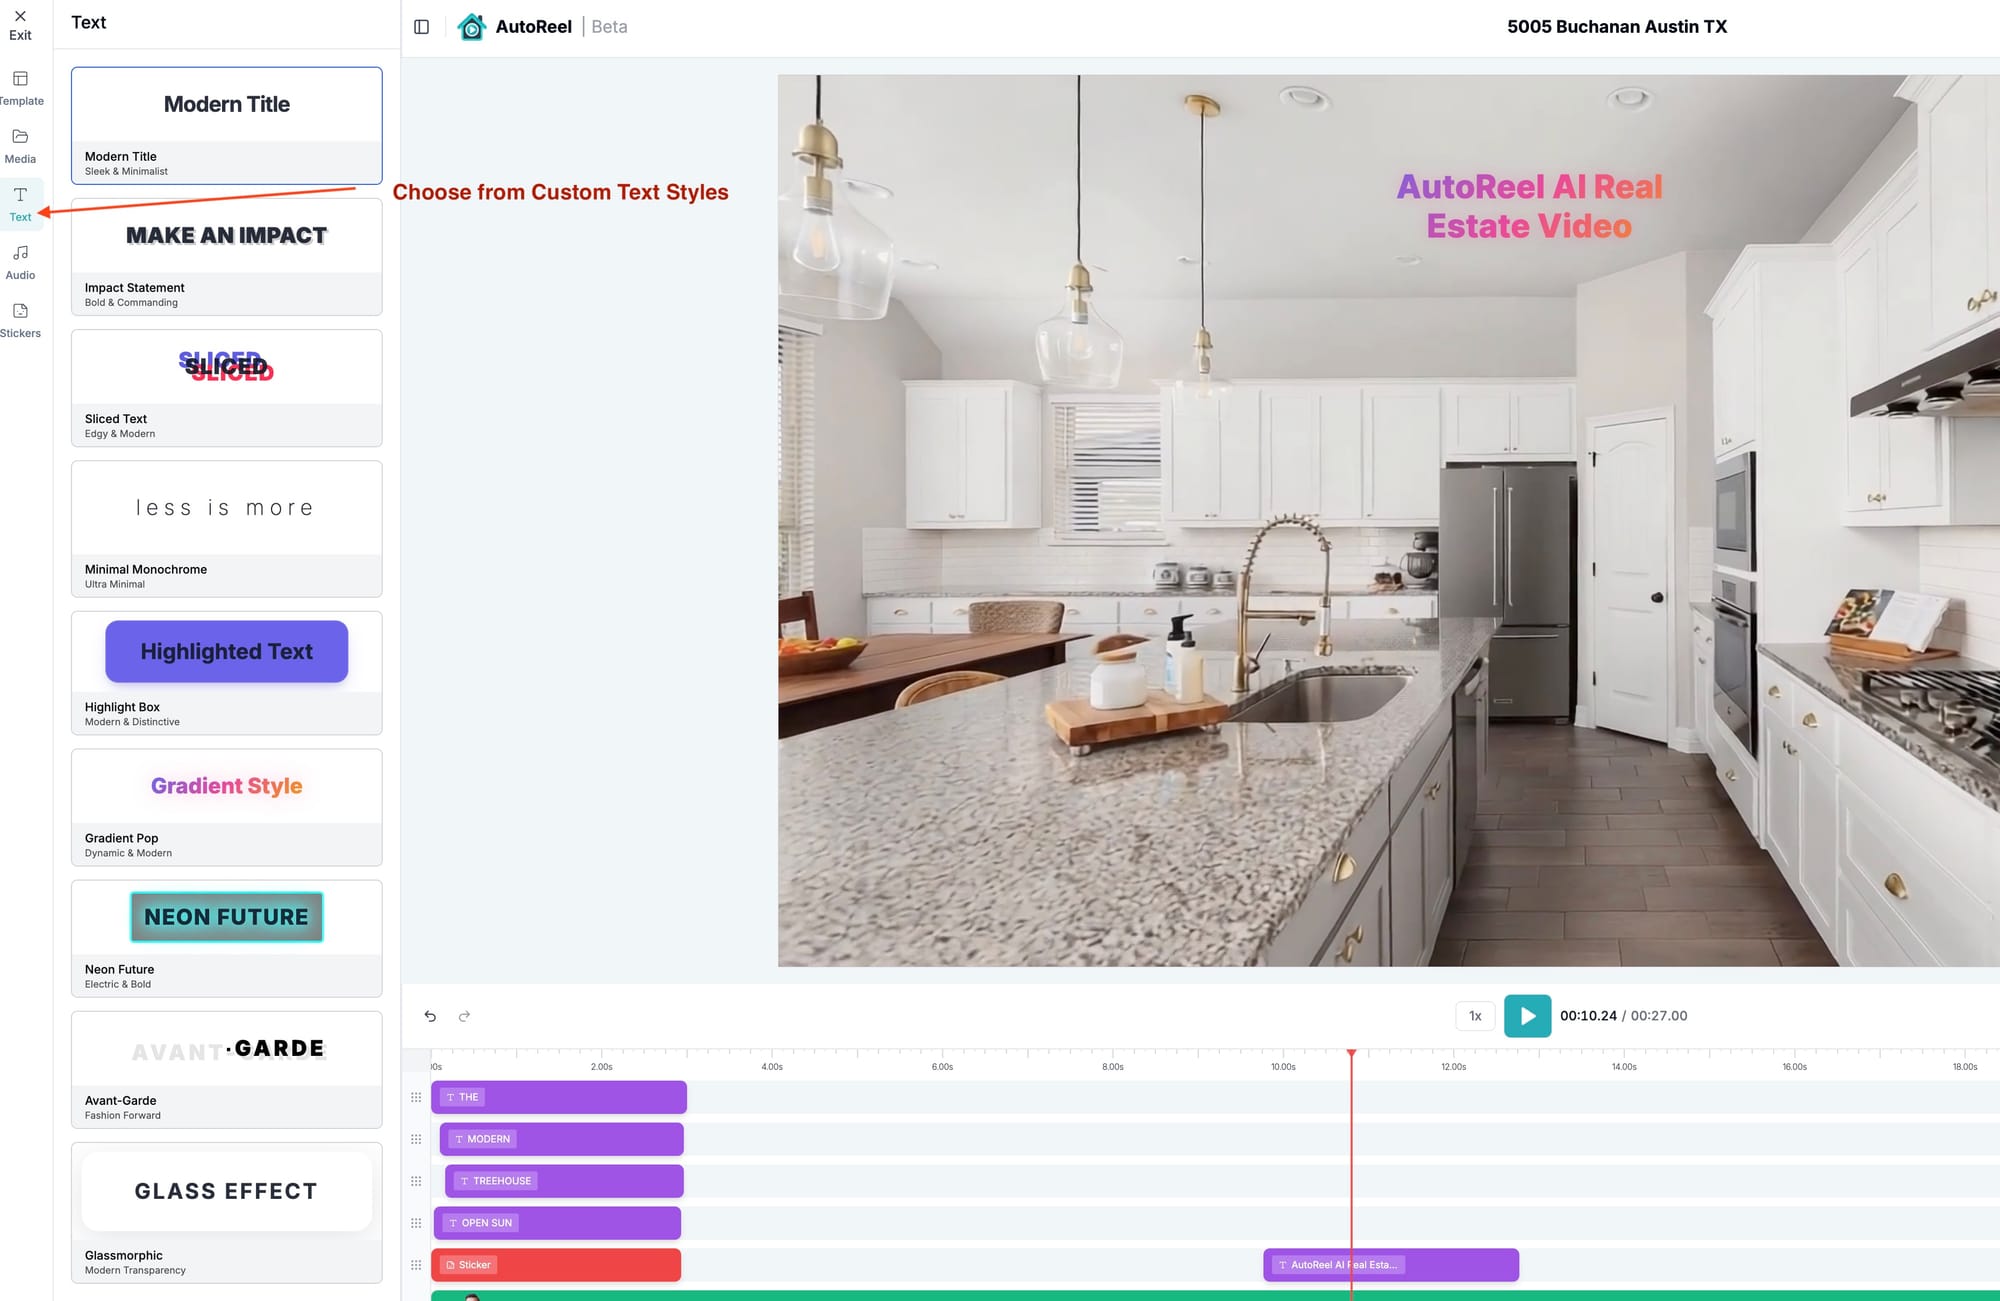
Click on any text block to update the words on the left sidebar (once the text block is selected in the timeline). There's also many new text-styles you can use to add text anywhere in the video.

<figure><img src="https://www.blog.autoreelapp.com/content/images/2025/08/custom-text-styles.jpg" alt="" width="563"><figcaption><p>Add text anywhere in your video with many styles available.</p></figcaption></figure>

You can:

* Move text blocks to new positions
* Adjust entrance/exit animations
* Customize fonts, colors, and styles

### **🎵 Step 6: Add or Change Music** <a href="#f0-9f-8e-b5-step-6-add-or-change-music" id="f0-9f-8e-b5-step-6-add-or-change-music"></a>

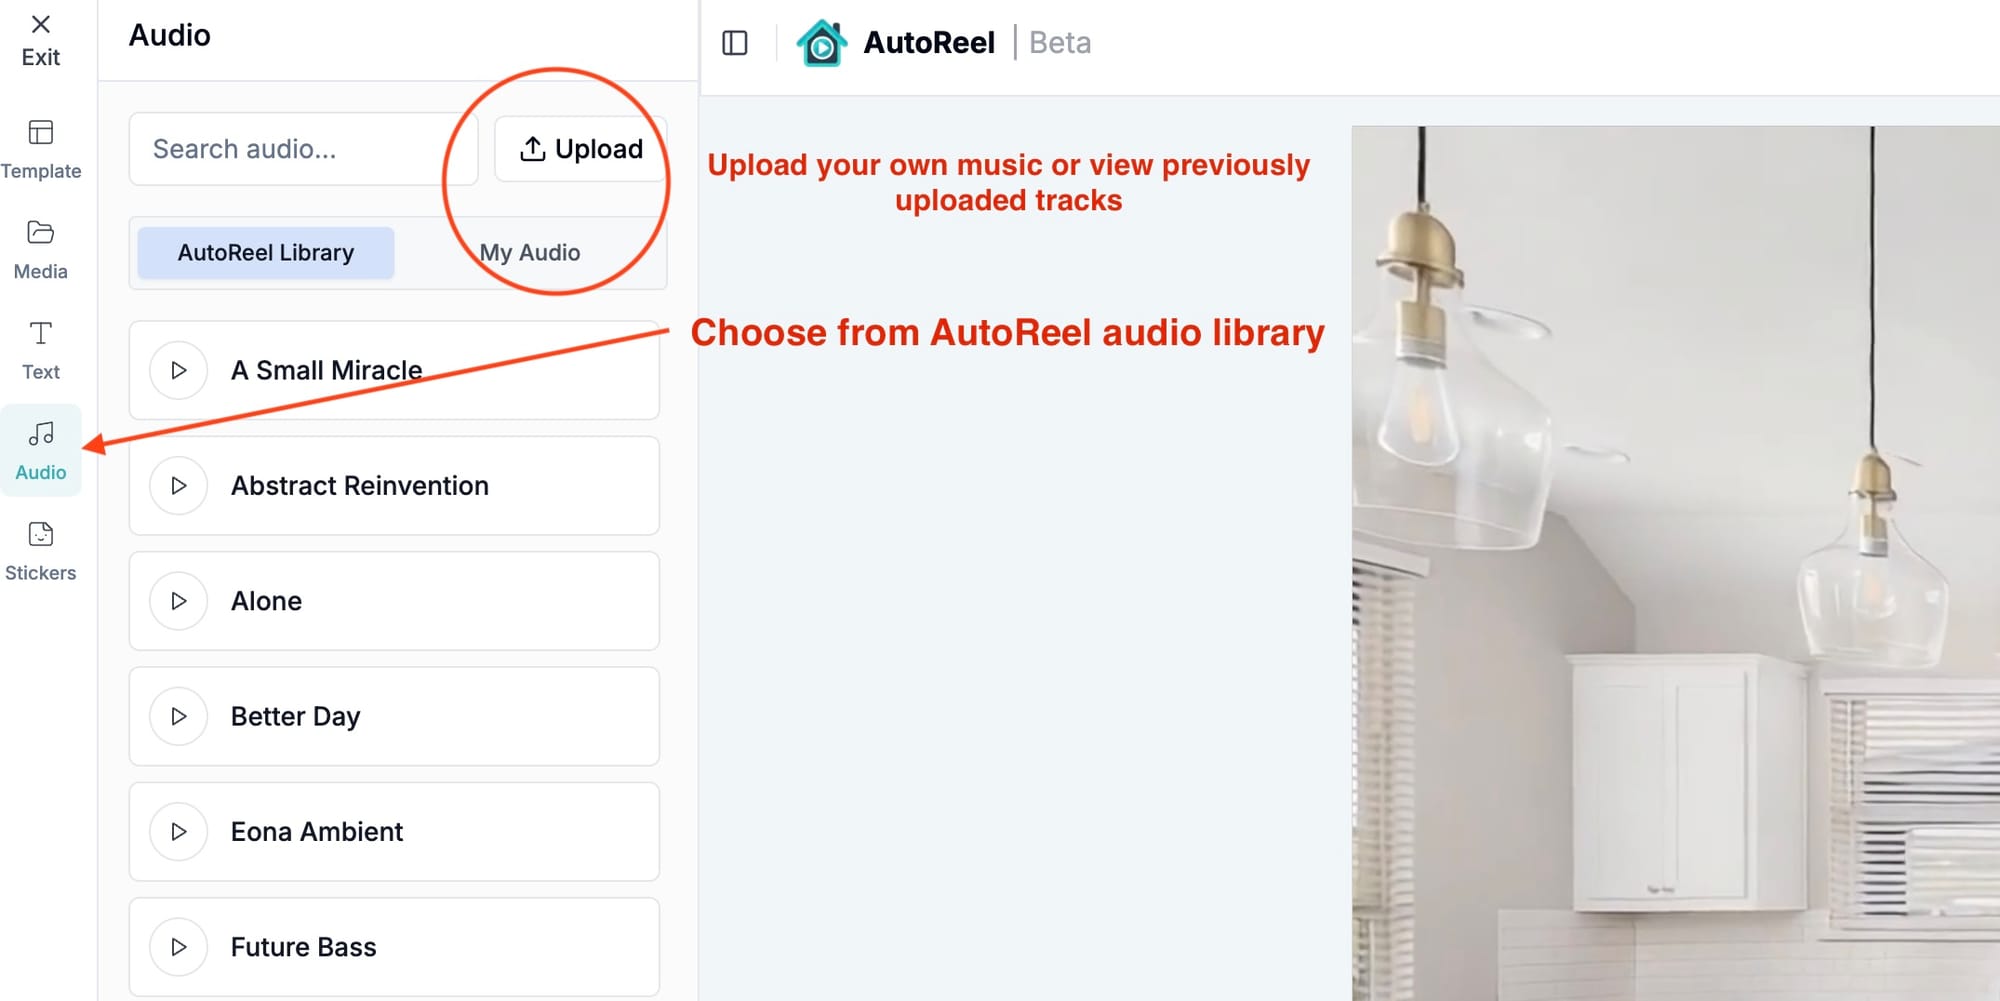
AutoReel Studio includes a built-in music library, or you can upload your own background track.

Click the **Audio** tab and either:

* Browse from our royalty free music collection
* Upload your own audio file

<figure><img src="https://www.blog.autoreelapp.com/content/images/2025/08/music.jpg" alt="" width="563"><figcaption><p>Click "Audio" in the left-side pane to browse from AutoReel's available music library or upload your own.</p></figcaption></figure>

### **✂️ Step 7: Trim, Split, or Remove Clips** <a href="#e2-9c-82-ef-b8-8f-step-7-trim-split-or-remove-clips" id="e2-9c-82-ef-b8-8f-step-7-trim-split-or-remove-clips"></a>

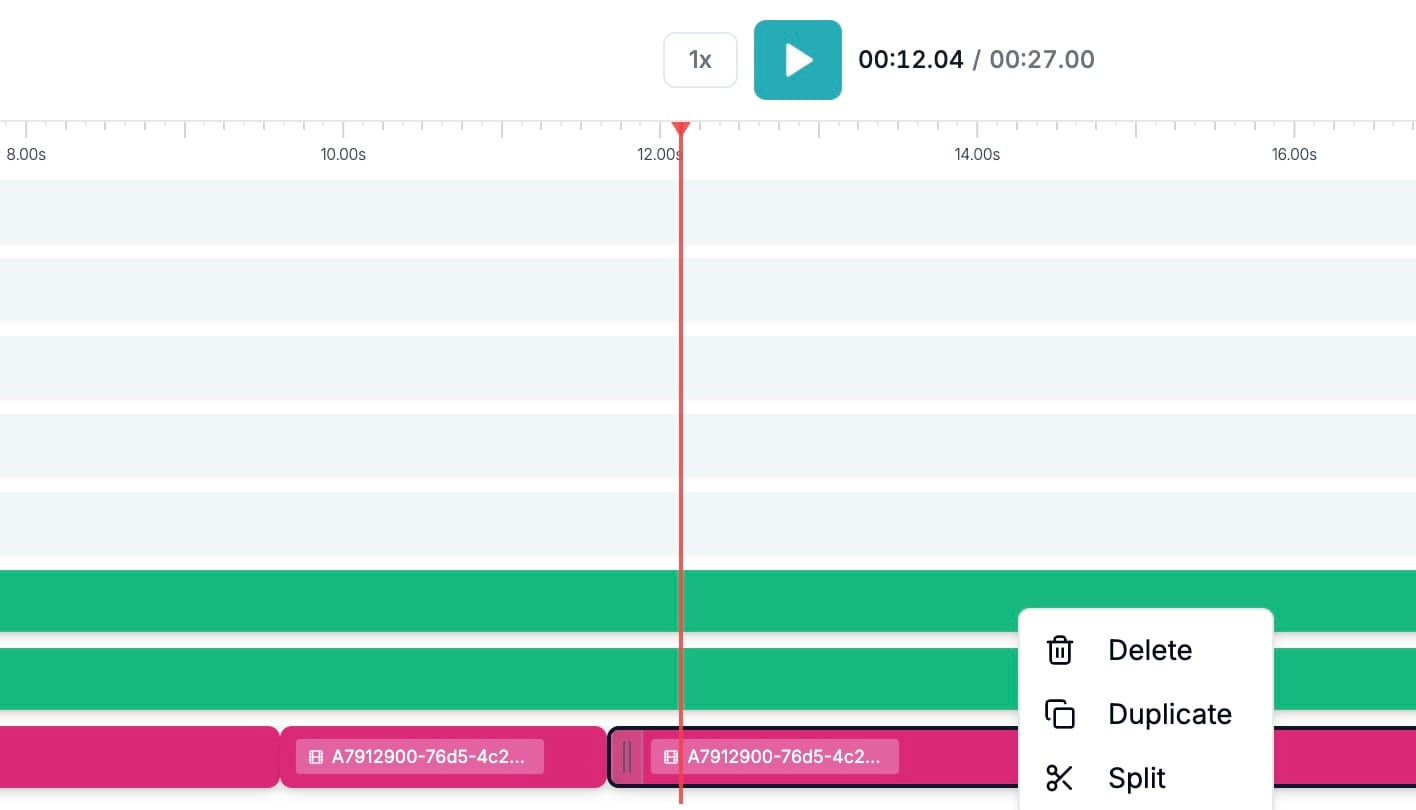
Need to remove a section or re-order clips? Just right-click on any video segment in the timeline.

You can:

* **Split** a clip at any time point
* **Delete** a scene
* **Duplicate** sections to reuse content

<figure><img src="https://www.blog.autoreelapp.com/content/images/2025/08/split-clips-head.jpg" alt="" width="563"><figcaption><p>Trim, Duplicate, or Delete elements by right clicking on the element within the timeline.</p></figcaption></figure>

### **✅ Step 8: Preview and Render** <a href="#e2-9c-85-step-8-preview-and-render" id="e2-9c-85-step-8-preview-and-render"></a>

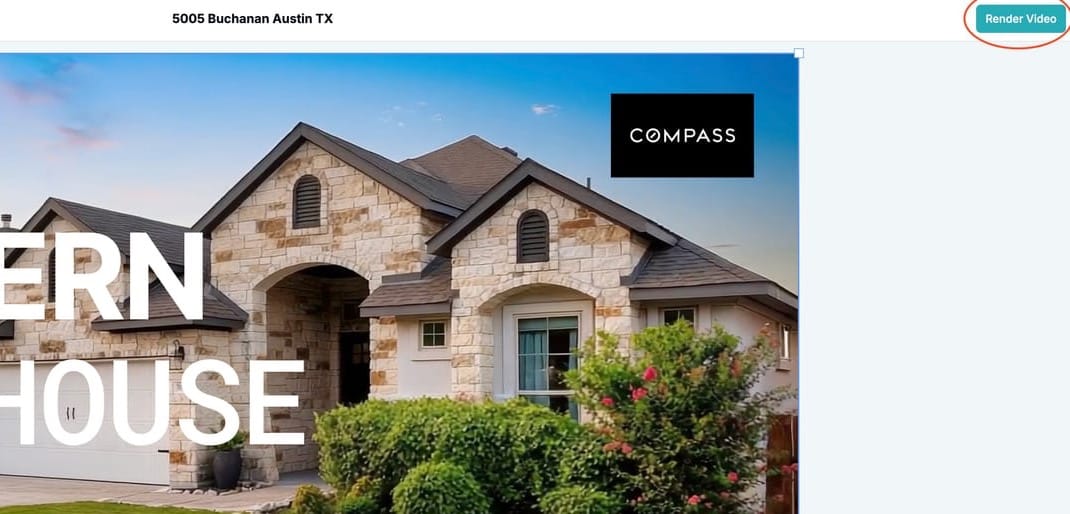
Once you're happy with your changes, playback your video by clicking the play button in the center of the timeline or spacebar. Once you're ready to finalize the video, click the **Render Video** button at the top right. Your final video will be processed and saved to your AutoReel account, ready to download or share.

<figure><img src="https://www.blog.autoreelapp.com/content/images/2025/08/render-finalize-video-1.jpg" alt="" width="563"><figcaption></figcaption></figure>

### **🎉 That’s it!** <a href="#f0-9f-8e-89-that-e2-80-99s-it" id="f0-9f-8e-89-that-e2-80-99s-it"></a>

AutoReel Studio gives you full creative freedom, without the tech headache or time.

Whether you're highlighting an open house, elevating your brand, or making quick edits before sharing — it’s all now possible inside AutoReel. No separate software or apps needed. No exporting and re-uploading. Just a powerful end-to-end real estate video platform.<br>


# How To: Download and Share Videos

Once your video is ready, click the **Share** button to access the following options:

* **Copy Link:** Share your video instantly with a direct link.
* **Download Video:** Download the full video to your device.
* **Download Video Clips:** Download a zip file of each individual clip separately.

If you're on an iPhone, it will save to your Downloads folder. [Learn how to download to your camera roll here.](/creating-a-video/how-to-download-and-share-videos/download-to-iphone)

<figure><img src="/files/LEyjWEMldXPfXhZHtAVM" alt=""><figcaption></figcaption></figure>


# Schedule and Post to social media

AutoReel can post your videos to Instagram and Facebook for you.

## Step by Step Video Walkthrough (4 minutes)

{% embed url="<https://www.youtube.com/watch?v=uQeInu3se0E>" %}

Connect your accounts once, then post right away or set a time for later.

Find it in the sidebar under **Social media manager** to get started.

<figure><img src="/files/i0pjBQajPbQUNh6fmts3" alt="" width="355"><figcaption></figcaption></figure>

### Requirements

**Note: For security and privacy reasons, Facebook and Instagram impose certain requirements to enable social sharing.**

Check and confirm the below requirements are met before proceeding.

| Requirement                                                                     | Why                                                                 | How To                                                                                   |
| ------------------------------------------------------------------------------- | ------------------------------------------------------------------- | ---------------------------------------------------------------------------------------- |
| Instagram Account must be a **Business** or **Creator** account (both are free) | Instagram does not let outside apps post from personal accounts     | [Setup Free Professional Instagram Account](https://help.instagram.com/502981923235522/) |
| A Facebook **Page** you are an admin of                                         | You can only post to a Facebook page rather than personal timeline. | [Create or Manage a Facebook Page](https://www.facebook.com/help/104002523024878)        |

Switching [Instagram to a professional account is free](https://help.instagram.com/502981923235522/) and takes about two minutes. You keep your followers and your posts.

Someone else runs your Facebook Page? Ask them to give you Facebook access with full control. Partial control is not enough. Send them this resource: [How do I give someone access to my Facebook Page?](https://www.facebook.com/business/help/152071822895768)

### Connect your accounts

Do this one time to connect your social media accounts.

1. Open **Social media manager** from the sidebar.
2. Click **Connect account** in the top right.
3. A secure window opens. Log in and pick your account.
4. You land back on AutoReel and see the account marked **Connected**.

Connect Instagram, a Facebook Page, or both.

### Post a video

<figure><img src="/files/9zf2f63Aet3QY0HvYSjC" alt="" width="375"><figcaption></figcaption></figure>

1. Find a finished video in your listings.
2. Click **Share >** **Post on socials**.

Then fill out the post details:

<img src="/files/9nnt83KLvAMiGcy37j4v" alt="" height="446" width="380">

1. **Pick your accounts.** All connected accounts are checked already. Click a card to turn one off.
2. **Write your caption.** Type it, or click **Generate with AI** and edit what you get. The counter shows how many characters you have left. It turns red if you go over.
3. **Pick your timing.**
   1. **Post now** sends it right away. This is the default.
   2. **Post later** shows a date and time picker. Set the day and time, then click **Schedule post**.

You land on the Social media manager page so you can watch it go out.

### Track your posts

Navigate to [Social Media Manager](https://www.autoreelapp.com/listings/social) from your sidebar to see a table which shows every post and it's status. You can use the filters to switch between All, Scheduled, Posted, and Failed.

Each row shows the video, the account, the scheduled time, and a status.

| Status              | What it means                                   |
| ------------------- | ----------------------------------------------- |
| **Scheduled**       | Waiting for its time. Nothing to do.            |
| **Publishing**      | Going out now.                                  |
| **Posted**          | It is live. Click **View** to see it.           |
| **Retrying**        | Something went wrong. AutoReel is trying again. |
| **Needs attention** | It got stuck. Take a look.                      |
| **Failed**          | It did not go out. Click **Retry**.             |
| **Canceled**        | You called it off. You can reschedule it.       |

### Frequently Asked Questions

| Problem                                 | Fix                                                                                            |
| --------------------------------------- | ---------------------------------------------------------------------------------------------- |
| Wrong Facebook Page name                | Disconnect, connect again, pick the right Page                                                 |
| Your Instagram account does not show up | It is still a personal account, or it is not connected to a Page. Fix both in Before you start |
| Schedule button does nothing            | Pick at least one account, and set a date and time                                             |
| Caption will not save                   | It is too long. Trim it until the counter turns back to normal                                 |
| Post says Failed                        | Click **Retry**. If it fails again, reconnect the account and reschedule                       |


# Download to iPhone

How to Download Your Video to the Photos App on iPhone

### 1. Download the video from AutoReel <a href="#h_d52d8ff414" id="h_d52d8ff414"></a>

1. On your iPhone, open your AutoReel video page. Click the **Share** button.
2. Tap the **Download Video** button. When prompted, choose Download.
3. The video will be saved to your Files app (usually in Downloads under *iCloud Drive* or *On My iPhone*).

[![move video from files to photos iphone](https://downloads.intercomcdn.com/i/o/t14s06gq/1654126006/e9b56a8038399bfda702e80e637e/move_file_to_photos_1.jpeg?expires=1772992800\&signature=7f836f7dba81991bfbb611671292da227684a8a5c1749bf624ad4332a6549a5d\&req=dSYiEsh8m4FfX%2FMW3nq%2Bge%2B9pVwOxbKXQxKKr8fw2DbNJxZt0a4Qg9Rhaq4t%0AQSPqwjvjB%2FD5%2B45Z8tn%2B%2FKfdhNY%3D%0A)](https://downloads.intercomcdn.com/i/o/t14s06gq/1654126006/e9b56a8038399bfda702e80e637e/move_file_to_photos_1.jpeg?expires=1772992800\&signature=7f836f7dba81991bfbb611671292da227684a8a5c1749bf624ad4332a6549a5d\&req=dSYiEsh8m4FfX%2FMW3nq%2Bge%2B9pVwOxbKXQxKKr8fw2DbNJxZt0a4Qg9Rhaq4t%0AQSPqwjvjB%2FD5%2B45Z8tn%2B%2FKfdhNY%3D%0A)

***

### 2. Move the video from Files to Photos <a href="#h_73e9174c37" id="h_73e9174c37"></a>

1. Open the Files app on your iPhone.
2. Navigate to the folder where the video was saved (often: Browse → On My iPhone → Downloads).
   1. [![how to save photos from files to camera roll](https://downloads.intercomcdn.com/i/o/t14s06gq/1654126547/3d258818f427d78a5396756acb5c/move_file_to_photos_2.jpeg?expires=1772992800\&signature=51b7b760862e2b30b1ac62cc88f605f766d3ebb077d066dd34890da9cdbb383d\&req=dSYiEsh8m4RbXvMW3nq%2BgZoYaUh8gquFfEw4YwFJLXhLNi8lqzb1%2Bwx6wGTW%0A9CD%2FLN3mZelCewyD7vawRMtLwek%3D%0A)](https://downloads.intercomcdn.com/i/o/t14s06gq/1654126547/3d258818f427d78a5396756acb5c/move_file_to_photos_2.jpeg?expires=1772992800\&signature=51b7b760862e2b30b1ac62cc88f605f766d3ebb077d066dd34890da9cdbb383d\&req=dSYiEsh8m4RbXvMW3nq%2BgZoYaUh8gquFfEw4YwFJLXhLNi8lqzb1%2Bwx6wGTW%0A9CD%2FLN3mZelCewyD7vawRMtLwek%3D%0A)
3. Tap the video to open it.
4. Tap the Share icon (square with an up arrow).
   1. [![import photos from files to photos](https://downloads.intercomcdn.com/i/o/t14s06gq/1654127024/304660da07cd6fc3afe2e9b7bd35/move_file_to_photos_3.jpeg?expires=1772992800\&signature=fbc27418070de4efc5a771d30dccdaa88e7ba6e7ccbc1e2f51f4ebf870d6e9b5\&req=dSYiEsh8moFdXfMW3nq%2BgbEjBLp%2F08ubx7Zqy7%2BkxhZ%2FFa%2BUemSoF2ogzCEo%0A36EE8DN5hLVkdzLzQRLQvJWw0p4%3D%0A)](https://downloads.intercomcdn.com/i/o/t14s06gq/1654127024/304660da07cd6fc3afe2e9b7bd35/move_file_to_photos_3.jpeg?expires=1772992800\&signature=fbc27418070de4efc5a771d30dccdaa88e7ba6e7ccbc1e2f51f4ebf870d6e9b5\&req=dSYiEsh8moFdXfMW3nq%2BgbEjBLp%2F08ubx7Zqy7%2BkxhZ%2FFa%2BUemSoF2ogzCEo%0A36EE8DN5hLVkdzLzQRLQvJWw0p4%3D%0A)
5. Select Save Video.
   1. [![how to download photos from files on iphone](https://downloads.intercomcdn.com/i/o/t14s06gq/1654127294/0520dd2a0bafaa27b2022d0b22aa/move_file_to_photos_4.jpeg?expires=1772992800\&signature=3978919870b357ca479fbf4f03f15dd47dfff5b22d08c03c55e0f582927d2c83\&req=dSYiEsh8moNWXfMW3nq%2BgcQWbwLYilrgr20Zfm53NVFlU%2BhLN3APRkfkO0yk%0Axn67nwnN8yfO9%2F24A5sZQPQ079Y%3D%0A)](https://downloads.intercomcdn.com/i/o/t14s06gq/1654127294/0520dd2a0bafaa27b2022d0b22aa/move_file_to_photos_4.jpeg?expires=1772992800\&signature=3978919870b357ca479fbf4f03f15dd47dfff5b22d08c03c55e0f582927d2c83\&req=dSYiEsh8moNWXfMW3nq%2BgcQWbwLYilrgr20Zfm53NVFlU%2BhLN3APRkfkO0yk%0Axn67nwnN8yfO9%2F24A5sZQPQ079Y%3D%0A)
   2. This copies the video to your Photos app, where it will appear in the Recents and Videos albums.


# Photo Editing & Virtual Staging

AI Photo Edits brings powerful real estate–specific enhancements right inside AutoReel, letting you touch up and use your improved photos instantly in your videos all in one seamless flow.

{% embed url="<https://youtu.be/seV__q0s4hE>" %}

**Why this matters:**

* Save time & subscriptions: Edit directly inside AutoReel instead of juggling multiple apps.
* Look pro, consistently: Fix skies, brighten interiors, declutter, and keep brand style tight across a listing.
* Do more with each photo: Create multiple versions (e.g., daytime + twilight) and use them to tell a more engaging story.

**What you can edit today:**

Once AutoReel’s AI analyzes your photo, it instantly spots what can be improved and lets you make smart, realistic edits in just one click. Think of it like a photo magic wand built for real estate:

* **Add twilight skies** to make your exterior shots glow and stand out
* **Virtually stage** the living room with luxury furniture
* **Turn on the fireplace** for a warm, welcoming vibe
* **Fix up the lawn** so it looks lush and freshly maintained
* **Declutter or remove furniture** to help buyers visualize the open space

Prefer precision control? Add a custom prompt (e.g., “remove the wall art”, “make it look like springtime”, “add a ferrari to the driveway”) to make it your own, more examples provided in the guide below.

{% stepper %}
{% step %}

### Open a photo

You can start from either the Video creation flow or the Image Gallery. Hover over any image and click **AI Edit** to open the photo edit screen.

<figure><img src="/files/Z0COP75XLb6zZOL9emIF" alt="" width="563"><figcaption></figcaption></figure>

<figure><img src="/files/MxUJVSsHkn4wOVIG3FuJ" alt="" width="563"><figcaption></figcaption></figure>
{% endstep %}

{% step %}

### Analyze the photo

Click **Analyze** to have AutoReel's AI review your photo and generate tailored suggestions based on what it detects in the image.

<figure><img src="/files/KJpxDnQVtnELm5o9KWm3" alt=""><figcaption></figcaption></figure>
{% endstep %}

{% step %}

### Adjust the photo edit settings

In the left sidebar, you’ll see rows for each detected feature with a dropdown of actions, such as:

* Sky → Twilight
* Furniture → Remove furniture
* Lawn → Repair

You can also select your desired resolution. **Standard** will create standard resolution photos quickly, while **High** will create high resolution photos but take longer to process.

Add an **AI disclaimer** if you'd like to add "Virtually staged" or "Digitally altered" to the bottom right of the photo.&#x20;

Optionally, add an **Additional Prompt** (up to 250 characters) for fine-grained instructions.

<figure><img src="/files/i6flROaSWpGnPPVF1Q3v" alt=""><figcaption></figcaption></figure>
{% endstep %}

{% step %}

### Create your AI Edit

Click **Edit image**, and soon, a new version of your image appears alongside the original, so you can compare and select the best one for your video.

<figure><img src="/files/7hSq303xOkWSRPpR6hLJ" alt=""><figcaption></figcaption></figure>
{% endstep %}

{% step %}

### Virtual Staging

Click the **Virtual Staging** tab in the top left. Confirm the room type, then select your preferred furniture style. Click **Edit** to generate the staged version of the room.

<figure><img src="/files/aMbwhUoUt7JBWzrUSy3g" alt=""><figcaption></figcaption></figure>

<figure><img src="/files/5FoERdgaHuUhyLZzfkGs" alt=""><figcaption></figcaption></figure>
{% endstep %}
{% endstepper %}


# Full Platform Walkthrough

A complete 30-minute tour of everything AutoReel can do for your business.

This training covers the full AutoReel platform in one session. You'll see how to create and edit videos, use AI photo edits, virtual staging, voiceovers, and more.

**Best for:** Users who want to see the entire platform before diving in, or existing users looking for a refresher.

{% embed url="<https://youtu.be/Zm2iV-1qzHw>" %}

**Want something faster or more specific?** Each section of this guide has a short walkthrough (2-10 minutes) that covers exactly what you need:

* [How To: Create a Video](/creating-a-video/how-to-create-a-video)
* [How To: Edit a Video](/creating-a-video/how-to-edit-a-video)
* [Photo Edits & Virtual Staging](/photo-edits-and-virtual-staging/photo-editing-and-virtual-staging)
* [How To: Download and Share Videos](/creating-a-video/how-to-download-and-share-videos)

We recommend starting with **How To: Create a Video** and going from there. Most users have their first video ready in under 10 minutes.


# How AI Credits Work

AI Credits are used to add additional amounts of usage based AI features beyond what's already included in your AutoReel plan.

## AI Credits Enable Power Users

AI Credits let you use even more AI powered features to a listing than your plan already includes. About 9 out of 10 people never need them. They are for power users who want to pile on extra bells and whistles into their listings.

### The basics

* Every plan includes a set amount of AI features per video: photo edits, virtual staging, and video effects (VFX).
* That amount covers most people with room to spare.
* Want more? Add it anytime with AI Credits.
* 1 credit = 1 extra photo edit or 1 extra video effect. You only buy credits if you go past what your plan includes.

### Who this is really for

The pro stacking five effects on one video. The photographer staging or editing every shot in a 40 photo listing. If that is you, credits let you keep going as far as you want.

### What costs a credit

Only after you use up the free amount in your plan:

* An extra photo edit (this includes virtual staging).
* An extra video effect (VFX).

Each costs 1 credit. Same price for both.

### What is always free

* Everything your plan already includes.
* Unlimited revisions to photos that you used a Photo Edit on.
* Reordering, reusing, or clearing a video effect. Only adding a new effect, or regenerating one, costs a credit.

### What comes with each plan

Here is the free AI usage built into every plan, plus the price of an extra credit if you ever want more.

| Plan      | Billing | Videos included | Included photo edits (free) | Included VFX per video (free) | Extra credit (each) |
| --------- | ------- | --------------- | --------------------------- | ----------------------------- | ------------------- |
| Essential | Monthly | 3               | 15                          | 3                             | $0.89               |
| Essential | Annual  | 25              | 125                         | 3                             | $0.79               |
| Growth    | Monthly | 10              | 80                          | 6                             | $0.69               |
| Growth    | Annual  | 100             | 800                         | 6                             | $0.59               |
| Pro       | Monthly | 20              | 200                         | 8                             | $0.49               |
| Pro       | Annual  | 200             | 2000                        | 8                             | $0.39               |

The bigger your plan, the cheaper each extra credit gets.

#### How credits work

* You buy credits up front, in one purchase. No subscription.
* Run out? Buy more and keep going.
* See your balance anytime in the Manage Plan screen.

#### Good to know

* Credits do not expire while your plan is active.
* If you cancel, leftover credits stay good until the end of your current period.
* On a team or company account, credits are shared from one pool.
* On a monthly plan, your included AI features reset each month.
* On an annual plan, you get the whole year in one bucket. It does not refill each month, so you can use it when your listings pick up.
* Video credits and AI Credits are different. Video credits make videos. AI Credits add extra VFX or photo edits on top of what each video already includes.

### Still have questions?

[Contact us](https://www.autoreelapp.com/contact) anytime.